
Very useful guide
In this post we will demonstrate how to install & configure DomainKeys with postfix (MTA) on CentOS 7 , i am assuming Postfix is already installed with following domain and hostname.
Hostname = mail5.freshdaymall.com
Domain = freshdaymall.com
Step:1 Set EPEL Repository using below rpm command
OpenDKIM package is not available in the default yum repositories but available in CentOS 7 EPEL repositories.
[root@mail5 ~]# rpm -Uvh https://dl.fedoraproject.org/pub/epel/epel-release-latest-7.noarch.rpm
Step:2 Install OpenDKIM Package using yum
[root@mail5 ~]# yum install -y opendkim
Step:3 Run below Command to create keys
Execute the below command to create public & private keys under folder “/etc/opendkim/keys”
[root@mail5 ~]# opendkim-default-keygen
Generating default DKIM keys:
Default DKIM keys for freshdaymall.com created in /etc/opendkim/keys.
[root@mail5 ~]#
[root@mail5 ~]# cd /etc/opendkim/keys/
[root@mail5 keys]# ll
total 8
-rw-r----- 1 root opendkim 891 Nov 29 08:42 default.private
-rw-r--r-- 1 root opendkim 320 Nov 29 08:42 default.txt
[root@mail5 keys]#
default.private is the private key for the domain and default.txt is public key that we will publish in DNS record (TXT) in the domain. A Selector ( default ) is created while generating keys, a selector can be unique keyword which is associated in keys and included in DKIM signature.
Step:4 Edit the Following Files :
- /etc/opendkim.conf —- Config file of opendkim
- /etc/opendkim/KeyTable —- As name suggest it defines the path of private key for the domain
- /etc/opendkim/SigningTable — This file tells OpenDKIM how to apply the keys.
- /etc/opendkim/TrustedHosts — This file defines which hosts are allowed to use keys.
Edit the file “/etc/opendkim.conf” & set the below parameters.

Edit the KeyTable file and replace the example.com with your domain name.
[root@mail5 ~]# cat /etc/opendkim/KeyTable
# OPENDKIM KEY TABLE
# To use this file, uncomment the #KeyTable option in /etc/opendkim.conf,
# then uncomment the following line and replace example.com with your domain
# name, then restart OpenDKIM. Additional keys may be added on separate lines.

#default._domainkey.example.com example.com:default:/etc/opendkim/keys/default.private
default._domainkey.freshdaymall.com freshdaymall.com:default:/etc/opendkim/keys/default.private
[root@mail5 ~]#
Edit the SigningTable file and define who will sign the outgoing mails.
[root@mail5 ~]# cat /etc/opendkim/SigningTable
# WILDCARD EXAMPLE
# Enables signing for any address on the listed domain(s), but will work only if
# "refile:/etc/opendkim/SigningTable" is included in /etc/opendkim.conf.
# Create additional lines for additional domains.

*@freshdaymall.com default._domainkey.freshdaymall.com
As i am using * in above parameter which means all the users on domain are allowed to sign the emails.
Edit the TrustedHosts file , add Server’s FQDN and domain name below localhost ip (127.0.0.1)
[root@mail5 ~]# cat /etc/opendkim/TrustedHosts
# OPENDKIM TRUSTED HOSTS
# To use this file, uncomment the #ExternalIgnoreList and/or the #InternalHosts
# option in /etc/opendkim.conf then restart OpenDKIM. Additional hosts
# may be added on separate lines (IP addresses, hostnames, or CIDR ranges).
# The localhost IP (127.0.0.1) should always be the first entry in this file.

127.0.0.1
mail5.freshdaymall.com
freshdaymall.com
[root@mail5 ~]#
Step:5 Edit Postfix Config File (/etc/postfix/main.cf)
Add the below lines at end of /etc/postfix/main.cf file.
[root@mail5 ~]# vi /etc/postfix/main.cf
smtpd_milters = inet:127.0.0.1:8891
non_smtpd_milters = $smtpd_milters
milter_default_action = accept
Step:6 Start OpenDKIM & postfix Service
[root@mail5 ~]# hash -r
[root@mail5 ~]# systemctl start opendkim ; systemctl enable opendkim ; systemctl restart postfix
ln -s '/usr/lib/systemd/system/opendkim.service' '/etc/systemd/system/multi-user.target.wants/opendkim.service'
[root@mail5 ~]#
Step:7 Update the TXT DNS record of your domain.
Use the output of default.txt and update the DNS Record (TXT) of the Domain.

Step:8 Send a Test email and view the logs.
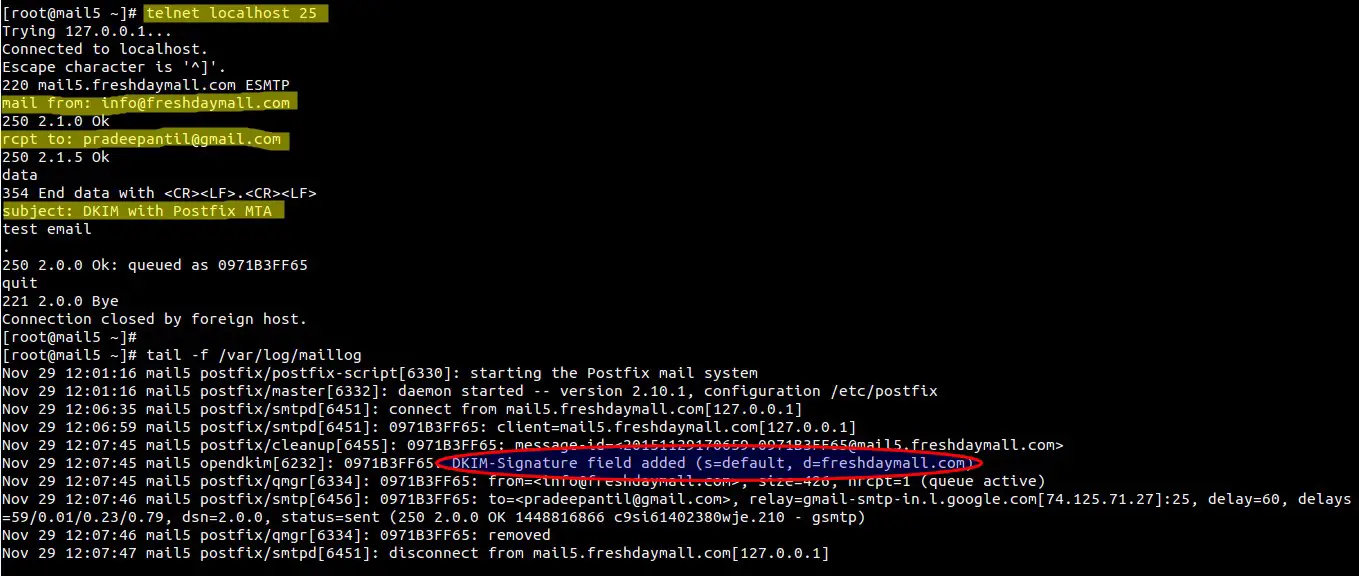
Check whether email is signed or not.

Wow , Our email is signed and domainKeys configuration task is completed now.
3) to verify the email send a test to : check-auth@verifier.port25.com
generate a file like this: vim public.txt
—–BEGIN PUBLIC KEY—–
public key created in the txt file
—–END PUBLIC KEY—–
openssl pkey -in public.txt -pubin -text -noout