
Our series of blockchain tutorials has been very popular. The tutorials have been read tens of thousands of times and several hundred people have joined our Telegram community to give us feedback and ask questions.
The most common feedback people give is that our blog posts are useful in making complicated blockchain concepts simple and understandable. However, they are missing Peer-to-Peer functionality.
We’ve done everything from showing you how to code Proof of Work to letting you know how IPFS works. However, in each of our tutorials, we relied on a central server to show you these concepts.
We will now show you how to run a simple blockchain in a truly decentralized, Peer-to-Peer fashion. Let’s get started!
Background
What is Peer-to-Peer (P2P)?
In true Peer-to-Peer architecture, you don’t need a central server to maintain the state of a blockchain. For example, when you send your friend some Bitcoin, the “state” of the Bitcoin blockchain should be updated so your friend’s balance increases and your balance decreases.
There isn’t a central authority like a bank that maintains the state. Instead, all the nodes in the Bitcoin network that wish to maintain a copy of the Bitcoin blockchain update their copies of the blockchain to include your transaction. That way, as long as 51% of the nodes in the network “agree” on the state of the blockchain, it maintains its fidelity. Read more on this consensus concept here.
In this tutorial, we will rework our post, Code your own blockchain in less than 200 lines of Go! so it uses a Peer-to-Peer architecture instead of a central server. We strongly recommend reading it before proceeding. It will help you understand the forthcoming code.
Let’s get coding!
Coding a P2P network is no joke. It has a ton of edge cases and requires a lot of engineering to make it scalable and reliable. Like any good engineer, we will first see what tools are available as a starting point. Let’s stand on the shoulders of giants.
Luckily, there is an excellent P2P library written in Go called go-libp2p. Coincidentally, it is made by the same folks who created IPFS. If you haven’t checked out our IPFS tutorial, take a look here (don’t worry it’s not mandatory for this tutorial).
Warning
As far as we can tell, this go-libp2p library has 2 drawbacks:
- Setup is a pain. It uses
gxas a package manager that we don’t find very convenient. - It appears to still be under heavy development. When working with the code, you will encounter some minor data races. They have some kinks to iron out.
Don’t worry about #1. We’ll help you through it. #2 is a bigger issue but won’t affect our code. However, if you do notice data races, they are most likely coming from the underlying code of this library. So make sure to open an issue and let them know.
There are very few modern, open source P2P libraries available, particularly in Go. Overall, go-libp2p is quite good and it’s well suited to our objectives.
Setup
The best way to get your code environment set up is to clone this entire library and write your code within it. You can develop outside the environment they provide but it requires knowing how to work with gx. We’ll show you the easy way. Assuming you already have Go installed:
go get -d github.com/libp2p/go-libp2p/...- navigate to the cloned directory from above
makemake deps
This gets you all the packages and dependencies you need from this repo through the gx package manager. Again, we don’t like gx as it breaks a lot of Go convention (besides, why not just stick with go get?) but it’s worth the inconvenience to use this otherwise nice library.
We’re going to develop inside the examples subdirectory. So let’s create a directory under examples called p2p with
mkdir ./examples/p2p
Then navigate to your new p2p folder and create a main.go file. We will be writing all our code in this file.
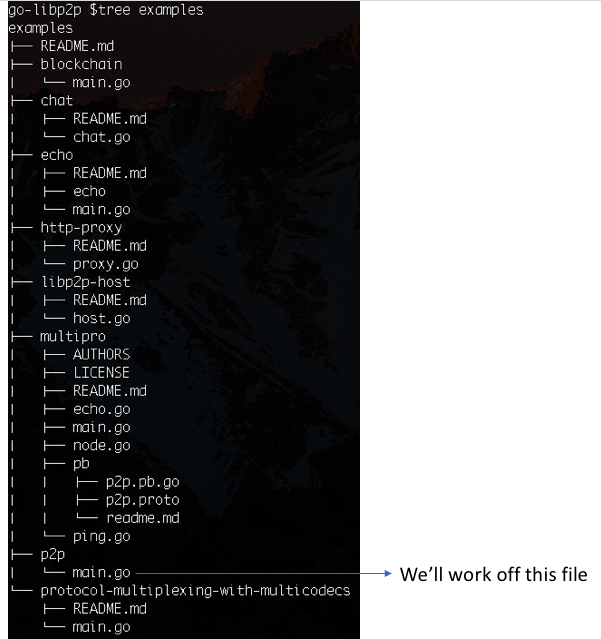
Your directory tree should look like this:
Open up your main.go file and let’s start writing our code!
Imports
Let’s make our package declaration and list our imports. Most of these imports are packages provided by the go-libp2p library. You’ll learn how to use each of them throughout this tutorial.
package main

import (
	"bufio"
	"context"
	"crypto/rand"
	"crypto/sha256"
	"encoding/hex"
	"encoding/json"
	"flag"
	"fmt"
	"io"
	"log"
	mrand "math/rand"
	"os"
	"strconv"
	"strings"
	"sync"
	"time"

	"github.com/davecgh/go-spew/spew"
	golog "github.com/ipfs/go-log"
	libp2p "github.com/libp2p/go-libp2p"
	crypto "github.com/libp2p/go-libp2p-crypto"
	host "github.com/libp2p/go-libp2p-host"
	net "github.com/libp2p/go-libp2p-net"
	peer "github.com/libp2p/go-libp2p-peer"
	pstore "github.com/libp2p/go-libp2p-peerstore"
	ma "github.com/multiformats/go-multiaddr"
	gologging "github.com/whyrusleeping/go-logging"
)
The spew package is a simple convenience package to pretty print our blockchain. Make sure to:
go get github.com/davecgh/go-spew/spew
Blockchain stuff
Remember! Read this tutorial before proceeding. The following section will be much easier to understand after reading it!
Let’s declare our global variables.
Blockis the transaction info we want. We are using BPM (beats per minute, or our pulse rate) as the key data point going in each block. Take your pulse rate and remember that number. Remember, we’re a healthcare company so we’re not going to use boring financial transactions as our block data 😉Blockchainis our “state”, or the latest blockchain, which is just a slice ofBlock- We declare a
mutexso we can control for and prevent race conditions in our code
Write out the following blockchain-specific functions.
isBlockValidchecks to see that the chain of hashes in each block of the blockchain is consistentcalculateHashusessha256to hash raw datagenerateBlockcreates a new block to be added to the blockchain, with the necessary transaction info inside it
P2P Stuff
Host
Now we get to the meat of our tutorial. The first thing we want to do is write the logic that allows a host to be created. When a node runs our Go program, it should act as a host to which other nodes (or peers) can connect. Here’s the code. Don’t stress, we’ll walk you through it 🙂
Our makeBasicHost function takes 3 arguments and returns the host and an error (which is nil if no errors are encountered).
listenPortis the port we specify in our command line flags that other peers connect toseciois a boolean that turns on and off secure data streams. It’s generally a good idea to use it. It stands for “secure input/output”randSeedis an optional command line flag that allows us to supply a seed to create a random address for our host. We won’t use this but it’s nice to have.
The function’s first if statement determines whether the seed was supplied and generates keys for our host accordingly. We then generate our public and private keys so our host stays secure. The opts section starts to construct the address to which other peers can connect.
The !secio part bypasses encryption but we’re going to use secio for security so this line doesn’t apply to us for now. It’s fine to have this option though.
We then create the host and finalize the addresses that other peers can connect to. The log.Printf part at the end is the helpful console message we print that tells a new node how to connect to the host we just created.
We then return the fully created host to the caller of the function. We now have our host!
Stream handler
We need to allow our host to deal with incoming data streams. When another node connects to our host and wants to propose a new blockchain to overwrite our own, we need logic to determine whether or not we should accept it.
When we add blocks to our blockchain, we want to broadcast it to our connected peer, so we need logic to do that as well.
Let’s create the skeleton of our handler.
We create a new ReadWriter since we need both read and write and we spin up separate Go routines to deal with the read and write logic.
Read
Let’s create our readData function first.
Our function is an infinite loop since it needs to stay open to incoming blockchains. We parse our incoming blockchain from a peer which is just a string of a JSON blob with ReadString. If it’s not empty (!= “\n”) we Unmarshal the blob first.
Then we check to see if the length of the incoming chain is longer than the blockchain we’re storing ourselves. For our purposes, we are simply going by blockchain length to determine who wins out. If the incoming chain is longer than ours, we’ll accept it as the latest network state (or the latest, “true” blockchain).
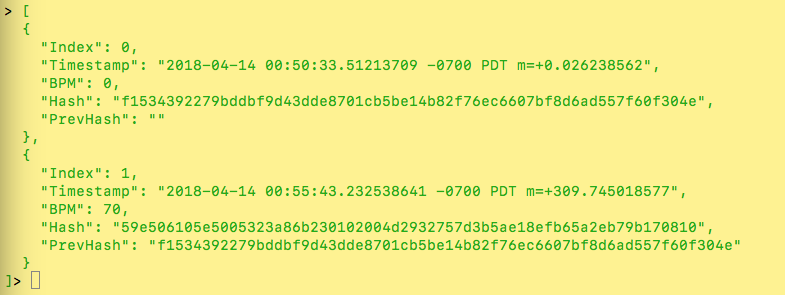
We’ll Marshal it back into a JSON format so it’s easier to read then we print it to our console. The fmt.Printf command prints in a different color so it’s easy for us to know it’s a new chain.
Now we’ve accepted our peer’s blockchain, if we add a new block to our blockchain, we need a way to let our connected peer know about it, so they can accept ours. We do that with our writeData function.
Write
We start the function off with a Go routine that broadcasts the latest state of our blockchain every 5 seconds to our peers. They’ll receive it and throw it away if the length is shorter than theirs. They’ll accept it if it’s longer. Either way, all the peers are constantly getting their blockchains updated by the latest state of the network.
We now need a way to create a new block with the pulse rate (BPM) we took earlier. We create a new reader with bufio.NewReader so it can read our stdin (console input). We want to be able to continually add new blocks so we put this in an infinite loop.
We do a little bit of string manipulation to make sure the BPM we type in is an integer and properly formatted to be added as a new block. We go through our standard blockchain functions (see the “Blockchain stuff” section above). Then we Marshal it so it looks pretty, print it to our console to verify with spew.Dump. We then broadcast it to our connected peer with rw.WriteString.
Great! We’ve now finished our blockchain functions and most of our P2P functions. We’ve created our handler, and the read and write logic to deal with incoming and outgoing blockchains. Through these functions we’ve created a way for each peer to continually check the state of their blockchain against each other and collectively, they all get updated to the latest state (longest valid blockchain).
All that’s left now is wiring up our main function.
Main function
Here is our main function. Have a look through it first then we’ll go through it step by step.
We start off by creating a Genesis block, which is our seed block for our blockchain. Again, if you read our previous tutorial this should be review.
We use the go-libp2p library’s logger to handle logging with SetAllLoggers. This is optional.
We then set all our command line flags.
seciowe covered previously and allows for secure streams. We’ll make sure to always use this by setting the flag when running our program.targetlets us specify the address of another host we want to connect to, which means we’re acting as a peer to a host if we use this flag.listenFopens the port we want to allow connections to, which means we’re acting as a host. We can be both a host (receive connections) and a peer (connect to other hosts). This is what makes this system truly P2P!seedis the optional randomness seeder used to construct our address that other peers can use to connect to us.
We then create a new host with the makeBasicHost function we created earlier. If we’re only acting as a host (i.e. we’re not connecting to other hosts) we specify that with if *target == “” , fire up our handler with the setStreamHandle function we made earlier and that’s the end of our listener code.
If we do want to connect to another host we move onto the else section. We set our handler again, since we’re acting as a host AND a connecting peer.
The next few lines deconstruct the string we supply to target so we can find the host we want to connect to. This is also called Decapsulation.
We end up with the peerID and target address targetAddr of the host we want to connect to and add that record into our “store” so we can keep track of who we’re connected to. We do that with ha.Peerstore().AddAddr
We then create our connection stream to the peer we want to connect to with ha.NewStream. We want to be able to receive and send them streams of data (our blockchain) so just like we did in our handler, we create a ReadWriterand spin up separate Go routines for readData and writeData. We finish off by blocking with an empty select statement so our program doesn’t just finish and quit.
Wahoo!
Guess what? We’re done! I know that was a bit of a handful but considering how complicated P2P engineering is you should proud that you made it to the end! That wasn’t too bad was it?
Complete Code
Here is the code in full.mycoralhealth/blockchain-tutorial
blockchain-tutorial – Write and publish your own blockchain in less than 200 lines of Gogithub.com
Test Drive
Now let’s get to what we’re all here for and try this out! We’re going to be using 3 separate terminals to act as individual peers.
Before starting the app, do yourself a favor and go to the root directory of go-libp2p and run make deps again. This makes sure your dependencies are in order. Again, this library uses the annoying gx package manager and we have to do a couple things to make it play nice.
Go back to your working directory.
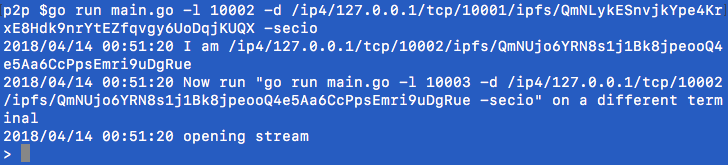
On your first terminal, go run main.go -l 10000 -secio

Follow the instructions that say “Now run…”. Open up a 2nd terminal, go to the same directory and go run main.go -l 10001 -d <given address in the instructions> -secio

You’ll see the first terminal detected the new connection!

Now following the instructions in the 2nd terminal, open up a 3rd terminal, go to the same working directory and go run main.go -l 10002 -d <given address in the instructions> -secio
Check out the 2nd terminal, which detected the connection from the 3rd terminal.

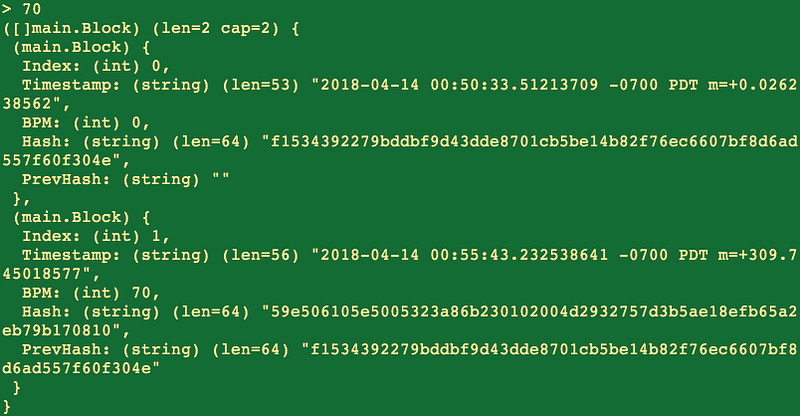
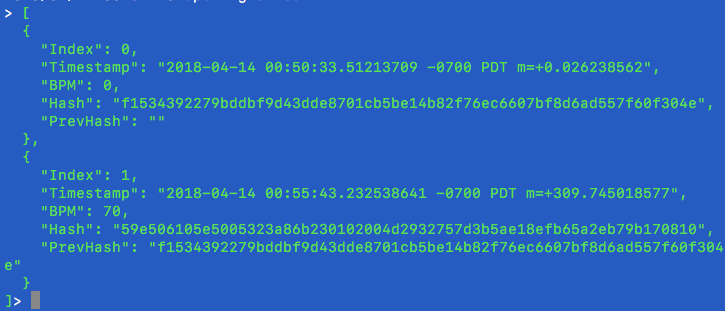
Now let’s start inputting our BPM data. Type in “70” in our 1st terminal, give it a few seconds and watch what happens in each terminal.
What just happened here? It’s really cool so let’s think it through.
- Terminal 1 added a new block to its blockchain
- It then broadcast it to Terminal 2
- Terminal 2 compared it against its own blockchain, which only contained its genesis block. It saw Terminal 1 had a longer chain so it replaced its own chain with Terminal 1’s chain. Then it broadcast the new chain to Terminal 3.
- Terminal 3 compared the new chain against its own and replaced it.
All 3 terminals updated their blockchains to the latest state with no central authority! This is the power of Peer-to-Peer.
Let’s test it again but this time allow Terminal 2 to add a block. Type in “80” into Terminal 2.
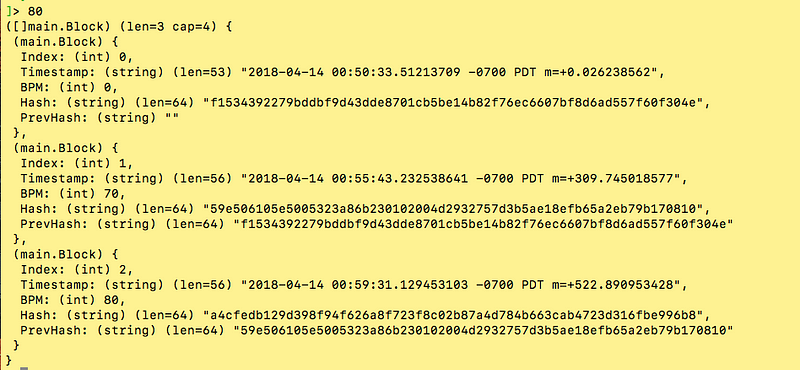
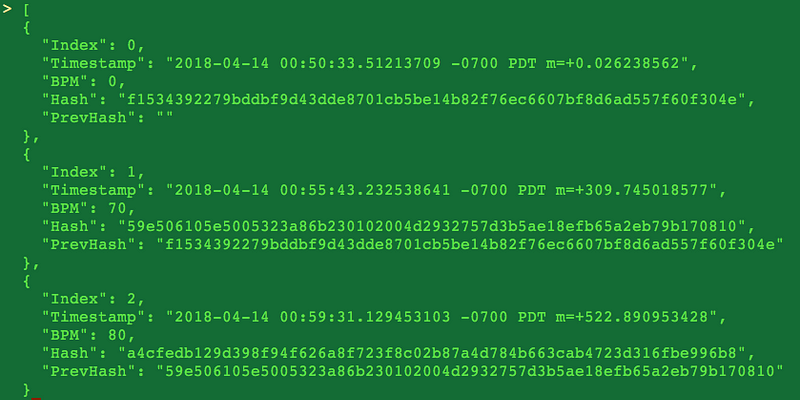
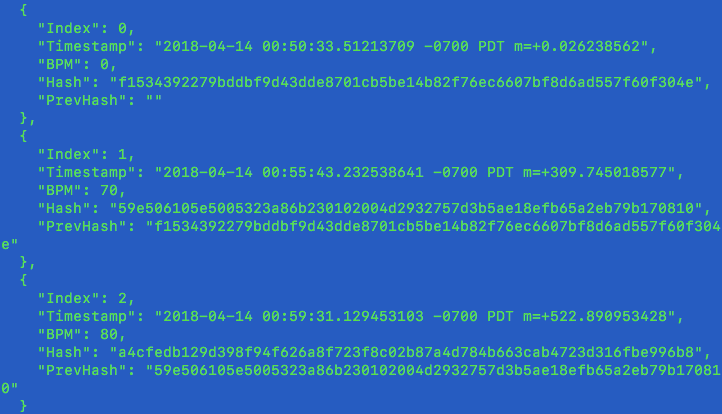
Awesome! As expected, this time Terminal 2 added a new block and broadcast it to the rest of the network. Each of the peers ran its own internal checks and updated their blockchains to the latest blockchain of the network!
Next Steps
Take a breather and enjoy your handy work. You just coded up a simple but fully functioning P2P blockchain in just a few hundred lines of code. This is no joke. P2P programming is very complicated, which is why you don’t see many simple tutorials out there on how to create your own P2P network.
There are some improvements and caveats to take away. Challenge yourself and try to tackle one or more of these:
- As mentioned, the
go-libp2plibrary is not perfect. We were careful to ensure our own code has minimal (if any) data races but while we were testing this library we noticed they had some data races in their code. It didn’t affect the results we were expecting to see but be extra cautious if you’re using this external library in production. Let them know about bugs you find as their library is a work in progress. - Try incorporating consensus mechanisms to this tutorial. We just did a simple check to see which blockchain was the longest, but you could incorporate either our Proof of Work or Proof of Stake tutorials to have a more robust check.
- Add persistence to the code. Right now, for simplicity, we shut down all the nodes if you kill one of them. You can leave all other nodes running even if one closes. If one node dies, it should be able to relay the info in its Peer Store to its connected nodes so they can connect to each other.
- This code hasn’t been tested with hundreds of nodes. Try writing a shell script to scale many nodes and see how performance is affected. If you notice any bugs, make sure to file an issue or submit a pull request in our Github repo!
- Look into node discovery. How do new nodes find existing nodes? Here’s a good place to start.
That’s all for now!
Where will your P2P journey go from here? Between this and our other tutorials, you have almost all the building blocks to create your own blockchain from scratch. That’s serious stuff!
Make sure to let us know what you think by joining our Telegramchat. This is the best place to get help with your code or just geek out with us on blockchain topics! We have a very vibrant community that would love to hear from you. Ask us anything!
Here are the links to our other tutorials. Read them all!