The command to show ip and mac address in a network is : apr -a
? (192.168.1.1) at c4:a8:1d:3a:5:a5 on en1 ifscope [ethernet]
? (192.168.1.6) at cc:b1:1a:bb:63:d6 on en1 ifscope [ethernet]

Linux Tutorial and something else…..
I don't know what's the matter with people: they don't learn by understanding, they learn by some other way — by rote or something. Their knowledge is so fragile! (Feynman)
The command to show ip and mac address in a network is : apr -a
? (192.168.1.1) at c4:a8:1d:3a:5:a5 on en1 ifscope [ethernet]
? (192.168.1.6) at cc:b1:1a:bb:63:d6 on en1 ifscope [ethernet]
SMTP AUTH for mail server is a feature that is often required to relay mail through other mail servers. To enable SMTP AUTH for Postfix, acting as mail client in this scenario, you need to do the following steps:
Procedure 10. Configure SMTP AUTH for mail servers
Postfix, acting as mail client in this scenario, will need to be able to
These informations are layed down in /etc/postfix/sasl_passwd:
[root@mail postfix]# less /etc/postfix/sasl_passwd # foo.comusername:password
# bar.com username:password
|
Using the hostname Postfix can identify the correct username:password when there are multiple entries in sasl_passwd |
|
username:password are entered in plaintext format. They are separated by a single colon “:” |
The mail server that we want to relay through in this example is mail.my-isp.org; username is test and it’s password is testpass. We open /etc/postfix/sasl_passwd and add our credentials. When we are done it looks like this:
[root@mail postfix]# cat /etc/postfix/sasl_passwd
mail.my-isp.org      test:testpass
As you have noticed, the credentials in sasl_passwd are entered plaintext. That means that anybody who can open the file will be able to read this sensitive information. Therefore we change ownership and permission to root and r/w only.
[root@mail postfix]# chown root:root /etc/postfix/sasl_passwd && chmod 600 /etc/postfix/sasl_passwd
After these commands ownership and permissions read like this:
[root@mail postfix]# ls -all /etc/postfix/sasl_passwd
-rw-------    1 root     root           79 Dec 30 23:50 /etc/postfix/sasl_passwd
![[Note]](http://postfix.state-of-mind.de/patrick.koetter/smtpauth/images/note.png) |
Note |
|---|---|
| You wonder why Postfix running as user postfix can read this file?
Postfix will start as user root, read all files that need root permission and switch to user postfix after that. |
|
Now that we have set correct ownership and permissions there is one more thing to do. A plaintext file can’t be read as fast as database. Postfix requires this file to be a database, because it doesn’t want to spend a lot of time looking the credentials up when it needs to get it’s job done. We create a sasl_passwd.db with the help of postmap:
[root@mail postfix]# postmap hash:/etc/postfix/sasl_passwd
After that there will be a new file sasl_passwd.db in /etc/postfix/.
[root@mail postfix]# ls -all /etc/postfix/sasl_passwd.db
-rw-------    1 root     root        12288 Mar 13 23:13 /etc/postfix/sasl_passwd.db
From the onwership and permissions you can see that postmap applied the same as in the source file. That’s it for sasl_passwd; you only need to get back when the informations need an update.
|
Note |
|---|---|
| Don’t forget to postmap the file, when you change credentials. Postfix will tell you anyway by claiming that sasl_passwd is newer than sasl_passwd.db in the maillog. | |
There are only three options that you must set to enable SMTP AUTH for mail servers in Postfix.
|
Note |
|---|---|
| You can easily tell that these parameters are settings for the smtp daemon. They all begin with smtp_. | |
The first thing we do is enabling SMTP AUTH for the smtp daemon. We open main.cf and enter some documentation first and then we set smtp_sasl_auth_enable to yes.
# SASL SUPPORT FOR SERVERS
#
# The following options set parameters needed by Postfix to enable
# Cyrus-SASL support for authentication of mail servers.
#
smtp_sasl_auth_enable = yes
Then we tell Postfix where to find sasl_passwd by adding smtp_sasl_password_maps = hash:/path/to/sasl_passwd to the configuration.
smtp_sasl_password_maps = hash:/etc/postfix/sasl_passwd
Finally we set security options. In our scenario we will allow Postfix to use anonymous and plaintext authentication. That’s why we set the paramter, but leave it empty:
smtp_sasl_security_options =
All settings together will give this listing in main.cf.
# SASL SUPPORT FOR SERVERS
#
# The following options set parameters needed by Postfix to enable
# Cyrus-SASL support for authentication of mail servers.
#
smtp_sasl_auth_enable = yes
smtp_sasl_password_maps = hash:/etc/postfix/sasl_passwd
smtp_sasl_security_options =
Very useful guide
In this post we will demonstrate how to install & configure DomainKeys with postfix (MTA) on CentOS 7 , i am assuming Postfix is already installed with following domain and hostname.
Hostname = mail5.freshdaymall.com
Domain = freshdaymall.com
OpenDKIM package is not available in the default yum repositories but available in CentOS 7 EPEL repositories.
[root@mail5 ~]# rpm -Uvh https://dl.fedoraproject.org/pub/epel/epel-release-latest-7.noarch.rpm
[root@mail5 ~]# yum install -y opendkim
Execute the below command to create public & private keys under folder “/etc/opendkim/keys”
[root@mail5 ~]# opendkim-default-keygen
Generating default DKIM keys:
Default DKIM keys for freshdaymall.com created in /etc/opendkim/keys.
[root@mail5 ~]#
[root@mail5 ~]# cd /etc/opendkim/keys/
[root@mail5 keys]# ll
total 8
-rw-r----- 1 root opendkim 891 Nov 29 08:42 default.private
-rw-r--r-- 1 root opendkim 320 Nov 29 08:42 default.txt
[root@mail5 keys]#
default.private is the private key for the domain and default.txt is public key that we will publish in DNS record (TXT) in the domain. A Selector ( default ) is created while generating keys, a selector can be unique keyword which is associated in keys and included in DKIM signature.
Edit the file “/etc/opendkim.conf” & set the below parameters.

Edit the KeyTable file and replace the example.com with your domain name.
[root@mail5 ~]# cat /etc/opendkim/KeyTable
# OPENDKIM KEY TABLE
# To use this file, uncomment the #KeyTable option in /etc/opendkim.conf,
# then uncomment the following line and replace example.com with your domain
# name, then restart OpenDKIM. Additional keys may be added on separate lines.

#default._domainkey.example.com example.com:default:/etc/opendkim/keys/default.private
default._domainkey.freshdaymall.com freshdaymall.com:default:/etc/opendkim/keys/default.private
[root@mail5 ~]#
Edit the SigningTable file and define who will sign the outgoing mails.
[root@mail5 ~]# cat /etc/opendkim/SigningTable
# WILDCARD EXAMPLE
# Enables signing for any address on the listed domain(s), but will work only if
# "refile:/etc/opendkim/SigningTable" is included in /etc/opendkim.conf.
# Create additional lines for additional domains.

*@freshdaymall.com default._domainkey.freshdaymall.com
As i am using * in above parameter which means all the users on domain are allowed to sign the emails.
Edit the TrustedHosts file , add Server’s FQDN and domain name below localhost ip (127.0.0.1)
[root@mail5 ~]# cat /etc/opendkim/TrustedHosts
# OPENDKIM TRUSTED HOSTS
# To use this file, uncomment the #ExternalIgnoreList and/or the #InternalHosts
# option in /etc/opendkim.conf then restart OpenDKIM. Additional hosts
# may be added on separate lines (IP addresses, hostnames, or CIDR ranges).
# The localhost IP (127.0.0.1) should always be the first entry in this file.

127.0.0.1
mail5.freshdaymall.com
freshdaymall.com
[root@mail5 ~]#
Add the below lines at end of /etc/postfix/main.cf file.
[root@mail5 ~]# vi /etc/postfix/main.cf
smtpd_milters = inet:127.0.0.1:8891
non_smtpd_milters = $smtpd_milters
milter_default_action = accept
[root@mail5 ~]# hash -r
[root@mail5 ~]# systemctl start opendkim ; systemctl enable opendkim ; systemctl restart postfix
ln -s '/usr/lib/systemd/system/opendkim.service' '/etc/systemd/system/multi-user.target.wants/opendkim.service'
[root@mail5 ~]#
Use the output of default.txt and update the DNS Record (TXT) of the Domain.

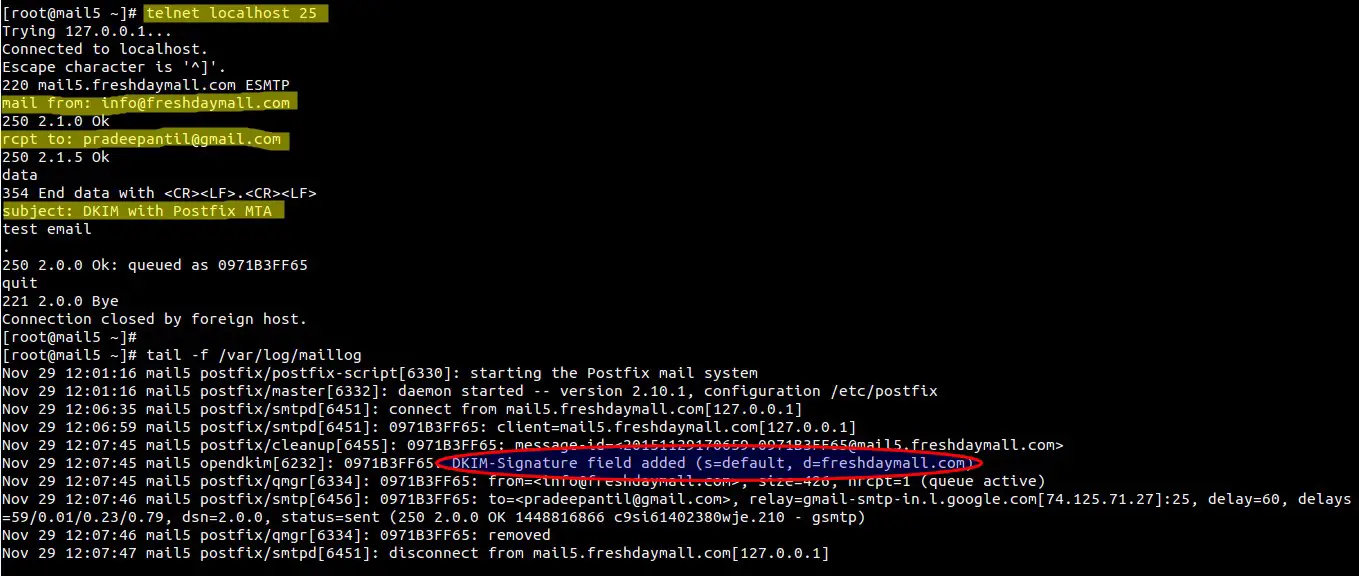
Check whether email is signed or not.

Wow , Our email is signed and domainKeys configuration task is completed now.
3) to verify the email send a test to : check-auth@verifier.port25.com
generate a file like this: vim public.txt
—–BEGIN PUBLIC KEY—–
public key created in the txt file
—–END PUBLIC KEY—–
openssl pkey -in public.txt -pubin -text -noout