[SOLVED] Denied DNS cache queries originating from 127.0.0.1

from here

i had thi situation:

[SOLVED] Denied DNS cache queries originating from 127.0.0.1

Hi,

recently Virtualmin complained that I needed to add 127.0.0.1 to the BIND Zones.
Since then I’ve started seeing the following entries in my /var/named/data/named.run:

13-Jan-2016 14:20:12.442 client 127.0.0.1#24778: query (cache) 'w3.org/NS/IN' denied
13-Jan-2016 14:20:12.442 client 127.0.0.1#24778: query (cache) 'comcast.net/NS/IN' denied
13-Jan-2016 14:20:12.443 client 127.0.0.1#24778: query (cache) 'akamai.com/NS/IN' denied
13-Jan-2016 14:21:03.839 client 127.0.0.1#33857: query (cache) 'cingular.com/NS/IN' denied
13-Jan-2016 14:21:03.839 client 127.0.0.1#33857: query (cache) 'kernel.org/NS/IN' denied
13-Jan-2016 14:21:03.840 client 127.0.0.1#33857: query (cache) 'gmx.net/NS/IN' denied
13-Jan-2016 19:55:38.304 client 127.0.0.1#30860: query (cache) 'sun.com/NS/IN' denied
13-Jan-2016 19:55:38.305 client 127.0.0.1#30860: query (cache) 'w3.org/NS/IN' denied
13-Jan-2016 19:55:38.307 client 127.0.0.1#30860: query (cache) 'mit.edu/NS/IN' denied

I already have the named-refused-udp and named-refused-tcp fail2ban jails activated, so I’m not worried about any such entries which originate from an external ip address.

What concerns me is those originating from 127.0.0.1.
Have I been hacked?

Thanks

i patch like this

I’ll answer my own question to help anyone else looking. To stop these entries add the following to /etc/named.conf

allow-query-cache { none; };
recursion no;
additional-from-auth no;
additional-from-cache no;
minimal-responses yes;

in this way:

options {

                listen-on port 53 { any; };

                listen-on-v6 port 53 { any; };

                directory       “/var/named”;

                dump-file       “/var/named/data/cache_dump.db”;

                statistics-file “/var/named/data/named_stats.txt”;

                memstatistics-file “/var/named/data/named_mem_stats.txt”;

                allow-query     { any; };

                allow-recursion {“none”;};

                recursion no;

                version “Not disclosed”;

                allow-query-cache { none; };

                additional-from-auth no;

                additional-from-cache no;

                minimal-responses yes;

…..

How to Install and Configure ‘Cache Only DNS Server’ with ‘Unbound’ in RHEL/CentOS 7

from here

Caching name servers using ‘Unbound‘ ( is a validating, recursive, and caching DNS server software ), back in RHEL/CentOS 6.x (where x is version number), we used bind software to configure DNS servers.

Here in this article, we are going to use ‘unbound‘ caching software to install and configure a DNS Server in RHEL/CentOS 7 systems.
Setup Cahing DNS Server in CentOS 7

Setup Cahing DNS Server in RHEL/CentOS 7

DNS cache servers are used to resolve any DNS query they receive. If the server caches the query and in future the same queries requested by any clients the request will be delivered from DNS ‘unbound‘ cache, this can be done in milliseconds than the first time it resolved.

Caching will only act as a agent to resolve the query of client from any one of the forwarders. Using caching server, will reduce the loading time of webpages by keeping the cache database in unbound server.

My Server and Client Setup

For demonstration purpose, I will be using two systems. The first system will act as a Master (PrimaryDNS server and the second system will act as a local DNS client.

Master DNS Server
Operating System   :    CentOS Linux release 7.0.1406 (Core)
IP Address	   :	192.168.0.50
Host-name	   :	ns.tecmintlocal.com
Client Machine
Operating System   :	CentOS 6
IP Address	   :	192.168.0.100
Host-name	   :	client.tecmintlocal.com

Step 1: Check System Hostname and IP

1. Before setting up a caching DNS server, make sure that you’ve added correct hostname and configured correct static IP address for your system, if not set the system static IP address.

2. After, setting correct hostname and static IP address, you can verify them with the help of following commands.

# hostnamectl
# ip addr show | grep inet
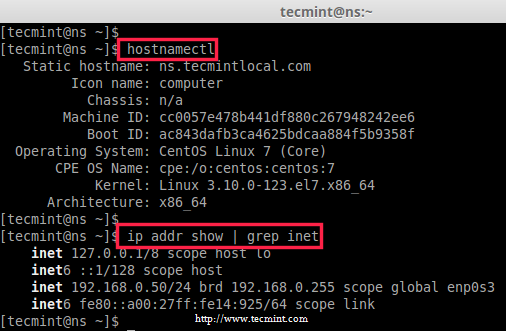
Check IP Address in CentOS 7

Check IP Address

Step 2: Installing and Configuring Unbound

3. Before installing ‘Unbound’ package, we must update the our system to latest version, after that we can install the unbound package.

# yum update -y
# yum install unbound -y

Install Unbound DNS Package in CentOS 7

Install Unbound DNS Package

4. After package has been installed, make a copy of the unbound configuration file before making any changes to original file.

# cp /etc/unbound/unbound.conf /etc/unbound/unbound.conf.original

5. Next, use any of your favorite text editor to open and edit ‘unbound.conf‘ configuration file.

# vim /etc/unbound/unbound.conf

Copy Unbound DNS Configuration

Copy Unbound DNS Configuration

Once the file is opened for editing, make the following changes:

Interfaces

Search for Interface and enable the interface which we going to use or if our server have multiple interfaces we have to enable the interface 0.0.0.0.

Here Our server IP was 192.168.0.50, So, i’am going to use unbound in this interface.

Interface 192.168.0.50
Enable IPv4 and Protocol Supports

Search for the following string and make it ‘Yes‘.

do-ip4: yes
do-udp: yes
do-tcp: yes
Enable the logging

To enable the log, add the variable as below, it will log every unbound activities.

logfile: /var/log/unbound
Hide Identity and Version

Enable following parameter to hide id.server and hostname.bind queries.

hide-identity: yes

Enable following parameter to hide version.server and version.bind queries.

hide-version: yes
Access Control

Then search for access-control to allow. This is to allow which clients are allowed to query this unbound server.

Here I have used 0.0.0.0, that means anyone send query to this server. If we need to refuse query for some range of network we can define which network need to be refuse from unbound queries.

access-control: 0.0.0.0/0 allow

Note: Instead of allow, we can replace it with allow_snoop this will enable some additional parameters like dig and it support both recursive and non recursive.

Domain Insecure

Then search for domain-insecure. If our domain is works with DNS sec keys, we need to define our server available for domain-insecure. Here our domain will be treated as insecure.

domain-insecure: "tecmintlocal.com
Forward Zones

Then change the forwarders for our requested query not fulfilled by this server it will forward to root domain (. ) and resolve the query.

forward-zone:
        name: "."
        forward-addr: 8.8.8.8
        forward-addr: 8.8.4.4

Finally, save and quit the configuration file using wq!.

6. After making the above configuration, now verify the unbound.conf file for any errors using the following command.

# unbound-checkconf /etc/unbound/unbound.conf

Check Unbound DNS Configuration

Check Unbound DNS Configuration

7. After file verification over without any errors, you can safely restart the ‘unbound’ service and enable it at system startup.

# systemctl start unbound.service
# sudo systemctl enable unbound.service

Start Unbound DNS Service

Start Unbound DNS Service

Step 3: Test DNS Cache Locally

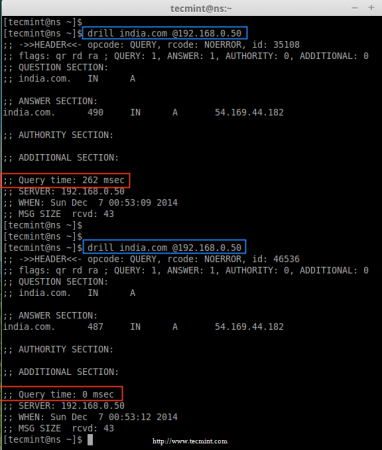
8. Now it’s time to check our DNS cache, by doing a ‘drill’ (query) one ‘india.com‘ domain. At first the ‘drill‘ command results for ‘india.com‘ domain will take some milliseconds, and then do a second drill and have a note on Query time it takes for both drills.

drill india.com @192.168.0.50
Check DNS Cache Locally

Check DNS Cache Locally

Did you see in the above output, the first query taken almost 262 msec to resolve and the second query takes 0 msec to resolve domain (india.com).

That means, the first query gets cached in our DNS Cache, so when we run ‘drill’ second time the query served from our local DNS cache, this way we can improve loading speed of websites.

Step 4: Flush Iptables and Add Firewalld Rules

9. We can’t use both iptables and firewalld at same time on same machine, if we do both will conflict with each other, thus removing ipables rules will be a good idea. To remove or flush the iptables, use the following command.

# iptables -F

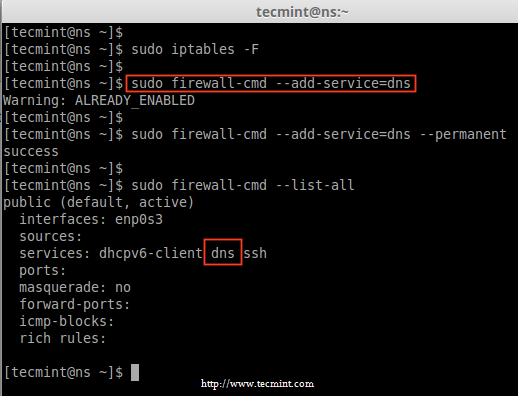
10. After removing iptables rules permanently, now add the DNS service to firewalld list permanently.

# firewall-cmd --add-service=dns
# firewall-cmd --add-service=dns --permanent

11. After adding DNS service rules, list the rules and confirm.

# firewall-cmd --list-all
Add DNS to Firewalld

Add DNS to Firewalld

Step 5: Managing and Troubleshooting Unbound

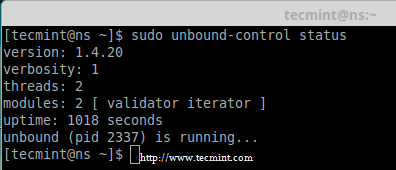
12. To get the current server status, use the following command.

# unbound-control status
Check Unbound DNS Status

Check Unbound DNS Status

Dumping DNS Cache

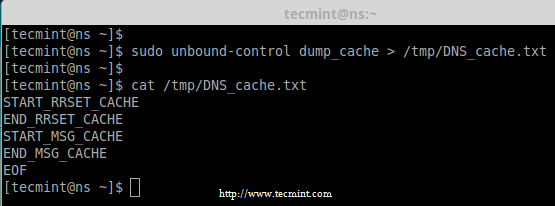
13. If in-case you would like to have a dump of a DNS cache information in a text file, you can redirect it to some file using below command for future use.

 # unbound-control dump_cache > /tmp/DNS_cache.txt
Backup DNS Cache

Backup DNS Cache

14. To restore or import the cache from the dumped file, you can use following command.

# unbound-control dump_cache < /tmp/DNS_cache.txt

Restore DNS Cache

Restore DNS Cache

Flushing DNS Records

15. To check whether the specific address was resolved by our forwarders in unbound cache Server, use the below command.

# unbound-control lookup google.com

Check DNS Lookup

Check DNS Lookup

16. Some times if our DNS cache server will not reply our query, in mean time we can use to flush the cache to remove information such as AAAANSSOCNAMEMXPTR etc.. records from DNS cache. We can remove all information using flush_zone this will remove all informations.

# unbound-control flush www.digitalocean.com
# unbound-control flush_zone tecmintlocal.com

17. To check which forwards are currently used to resolve.

# unbound-control list_forwards

Check Current DNS Forwards

Check Current DNS Forwards

Step 6: Client Side DNS Configuration

18. Here I’ve used a CentOS 6 server as my client machine, IP for this machine is 192.168.0.100 and I’m going to use my unbound DNS server IP (i.e Primary DNS) in it’s interface configuration.

Log-into the Client machine and set the Primary DNS server IP to our unbound server’s IP.

Run the setup command and choose network configuration from TUI network manager.

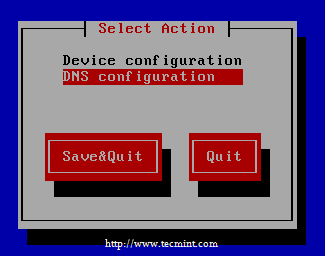
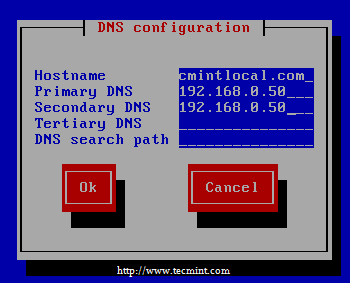
Then choose DNS configuration, insert the unbound DNS server’s IP as Primary DNS, but here i have used both in Primary and Secondary because I don’t have any other DNS server.

Primary DNS	: 192.168.0.50
Secondary DNS	: 192.168.0.50
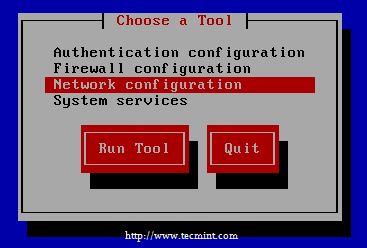
Select Network Configuration
Select Network Configuration

Select DNS Configuration
Select DNS Configuration

Enter DNS IP Address

Enter DNS IP Address

Click OK –> Save&Quit –> Quit.

19. After adding Primary and Secondary DNS IP addresses, now it’s time to restart the network using following command.

# /etc/init.d/network restart

Restart Network in CentOS 6

Restart Network

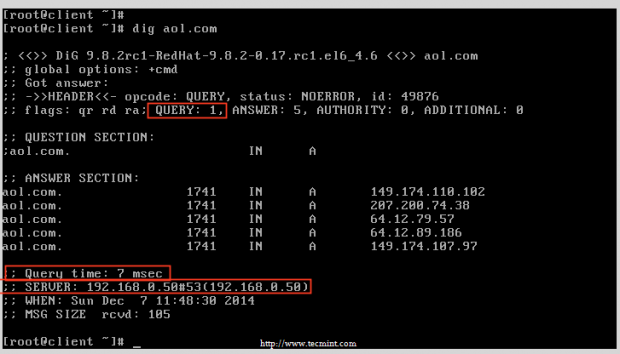
20. Now time to access any one of the website from client machine and check for the cache in unbound DNS server.

# elinks aol.com
# dig aol.com
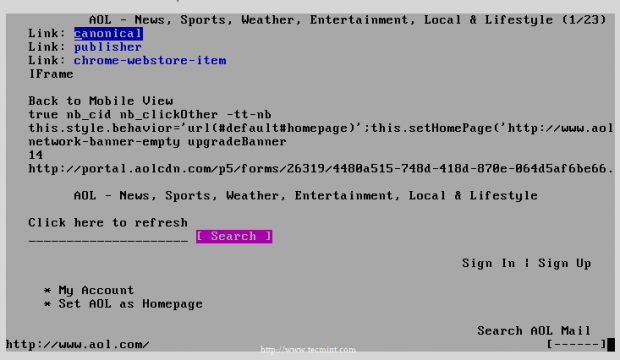
Check Website
Check Website

Query Website

Query Website

Setup DNSSEC support

Next, we instruct Unbound DNS server to generate RSA keys in order to provide DNSSEC support:

# unbound-control-setup 
setup in directory /etc/unbound
generating unbound_server.key
Generating RSA private key, 1536 bit long modulus
.................++++
.........++++
e is 65537 (0x10001)
generating unbound_control.key
Generating RSA private key, 1536 bit long modulus
.........++++
..................................++++
e is 65537 (0x10001)
create unbound_server.pem (self signed certificate)
create unbound_control.pem (signed client certificate)
Signature ok
subject=/CN=unbound-control
Getting CA Private Key
Setup success. Certificates created. Enable in unbound.conf file to use

All what remains is to check Unbound’s configuration:

# unbound-checkconf
unbound-checkconf: no errors in /etc/unbound/unbound.conf

Conclusion

Earlier we were used to setup DNS cache server using bind package in RHEL and CentOS systems. Now, we have seen how to setup a DNS cache server using unbound package. Hope this will resolve your query request quicker than the bind pacakge.

Usare un Content Delivery Network (CDN): come e perché

Nota Bene: Questo articolo non è più aggiornato da almeno 6 mesi perciò verifica le informazioni contenute che potrebbero essere obsolete.
Oggi analizziamo i motivi per cui è opportuno configurare e attivare una CDN per distribuire meglio i contenuti presenti sul nostro sito web.
Un Content Delivery Network può fornire una marcia in più ad un sito internet, grazie ad un sistema di caching reverse proxy, ottimizzandone così la velocità, l’esperienza utente e conseguentemente la SEO on-site grazie ad una migliore indicizzazione dei contenuti presenti sul dominio da parte dei motori di ricerca.

Naturalmente i visitatori non si renderanno conto del fatto che viene servita loro una copia del sito e non il contenuto originale.

Sommario

Scopriamo come e perchè configurare una #CDN con Cloudflare su un nostro sito webCONDIVIDI IL TWEET

Cos’è un Content Delivery Network

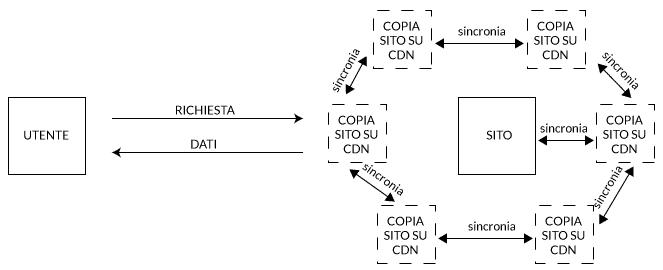
Una CDN è un  sistema di server, collegati fra loro tramite internet, che dialogano e collaborano in maniera tale da realizzare un sistema distribuito per la fornitura di contenuti all’utenza.

Quando un utente richiede un contenuto, dietro ad una CDN, il sistema instraderà la richiesta verso il nodo più vicino in modo da risparmiare tempo nel trasferimento dei dati.

In particolare una CDN è utile quando i nostri contenuti devono essere distribuiti in tutto il mondo o quando il server sui cui è ospitato il nostro sito è distante dal target del sito stesso.

Un ulteriore servizio che può fornire una CDN è quello di mitigare attacchi DDos, che vengono distribuiti sull’intera rete non sovraccaricando il server che ospita il nostro sito fino a farlo collassare e di mantenere online il nostro sito, fornendo una copia cache, quando il server su cui è ospitato collassa o viene spento per manutenzione o problemi tecnici.

Cloudflare

Una delle più famose CDN è Cloudflare, una impresa statunitense creata nel 2009 che, oltre a fornire un servizio di Content Delivery Network offre diversi servizi accessori.

In questi ultimi mesi Cloudflare ha sviluppato un nuovo datacenter a Milano, in Italia, fornendo così un nodo veloce e vicino a tutta l’utenza della penisola.

Cloudflare offre in maniera gratuita il servizio basico, che andremo ad analizzare in questo articolo, ma con una spesa di 20 €/mese potremo attivare un servizio di ottimizzazione dedicato per i dispositivi mobile, in modo da incrementare la velocità di caricamento delle pagine di un sito web quando richieste da smartphone o tablet.

Perché configurare una CDN

Come abbiamo visto è utile configurare una CDN per:

  • distribuire meglio i nostri contenuti nel mondo;
  • migliorare la sicurezza del nostro sito grazie al firewall integrato, se compreso nella CDN (Cloudflare offre questo servizio);
  • proteggere il nostro sito da attacchi DDos;
  • migliorare globalmente la SEO del nostro sito, grazie al incremento delle perfomance delle nostre pagine;

Classica comunicazione tra client e sito

comunicazione sito client

Comunicazione tra client e sito dietro a CDN

comunicazione sito cdn client

Come configurare una CDN su Cloudflare

Vediamo insieme come configurare una CDN mediante Cloudflare e il suo servizio gratuito.

Creazione Account

Come prima cosa è necessario creare un account su Cloudflare, che ci permetterà di gestire uno o più siti.

Visitiamo quindi la pagina di registrazione che richiede nome utente e password per l’account. A seguito di questa azione riceveremo una mail con un codice per attivare l’account.

Aggiunta di un sito

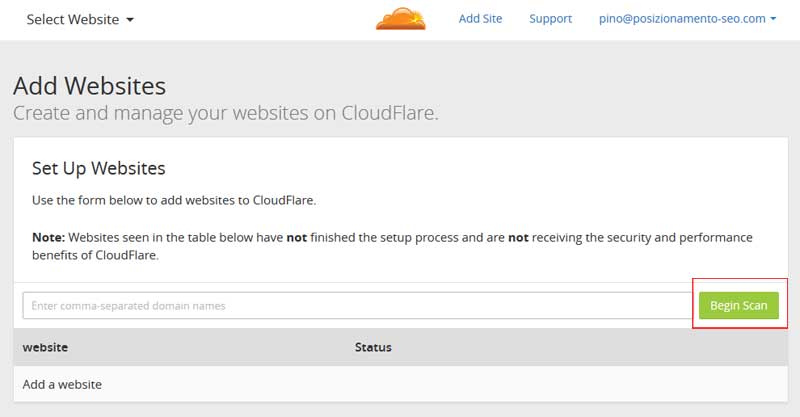
Dopo aver fatto accesso al servizio di CDN mediante il nostro nuovo e fiammante account aggiungiamo un sito al pannello. Se necessario è possibile aggiungere più di un sito, separando i domini dalla virgola.

aggiungi sito

Il dominio che vogliamo aggiungere va inserito nella forma pura, ossia nomedominio.tld. Nel caso di www.posizionamento-seo.com inserirò quindi posizionamento-seo.com.

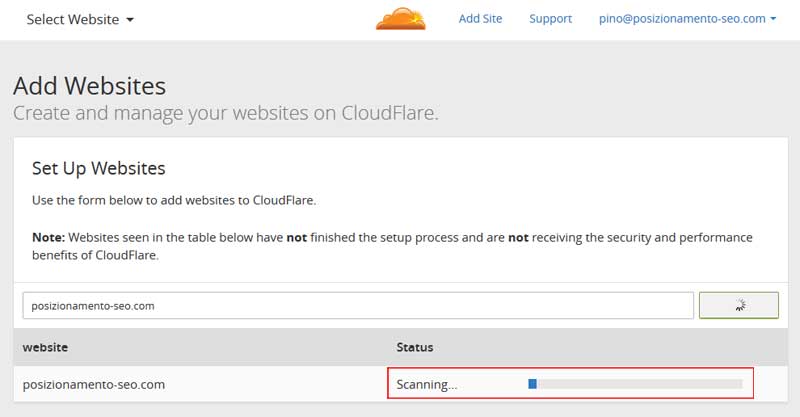
Premiamo quindi sul bottone Begin Scan e aspettiamo che il servizio faccia la scansione del nostro dominio.

scansione sito

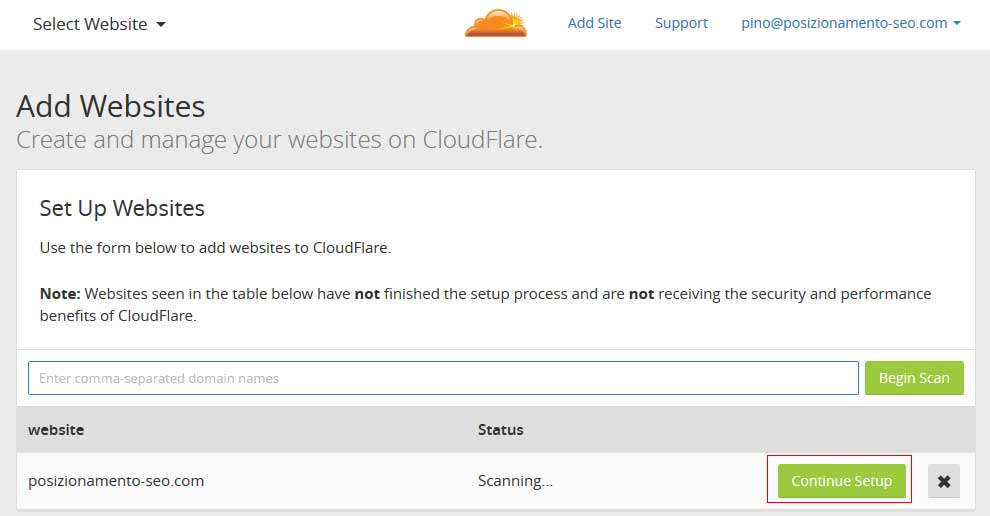
Una volta che il servizio ha completato la scansione del nostro dominio premiamo sul bottone Continue Setup.

aggiungi sito cdn

Nella pagina che comparirà dobbiamo poi selezionare per quali servizi attivare la nostra CDN.

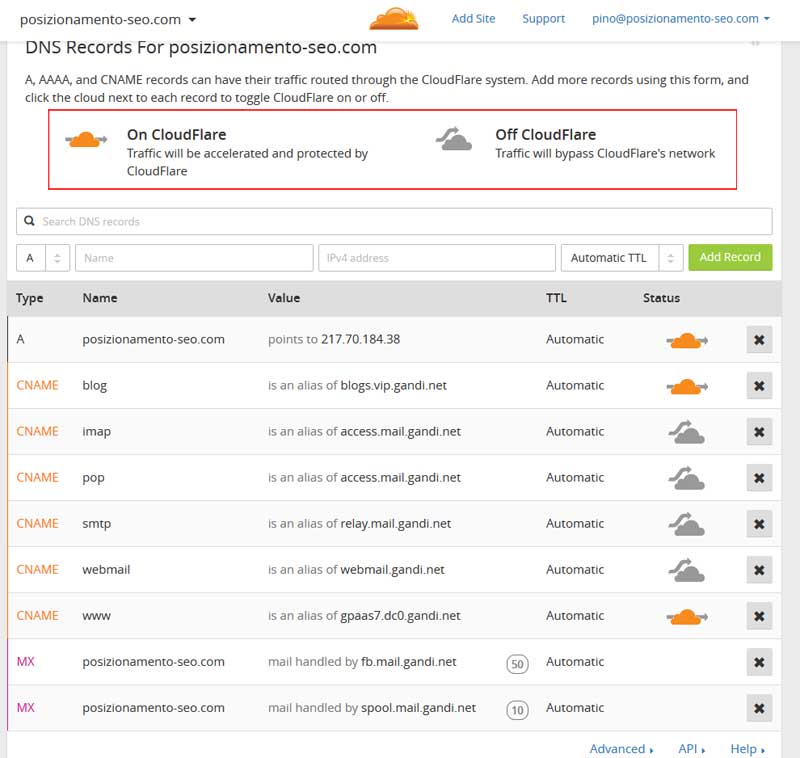
Per aiutarci Cloudflare ci mostra i servizi che ha rilevato sul nostro server, a seguito di scansione automatica, per cui offre dei consigli di attivazione o meno della Content Delivery Network.

selezione DNS record

Di nostro possiamo modificare questa preselezione automatica premendo sull’icona della nuvoletta con la freccia. Come è facilmente comprensibile nuvola grigia e freccia che la oltrepassa vuol dire servizio NON filtrato dalla CDN, mentre il contrario (CDN attiva) è contrassegnato dall’icona della nuova arancione con freccia passante.

Di suo Cloudflare non attiva il servizio sui protocolli imappopsmtp e webmail, tutti relativi alla gestione della posta elettronica.

In caso di configurazioni particolari e non rilevate automaticamente possiamo poi aggiungere dei record per poi selezionare se attivare o meno il servizio di CDN.

Una volta effettuata la nostra selezione premiamo sul bottone Continue, in fondo alla pagina.

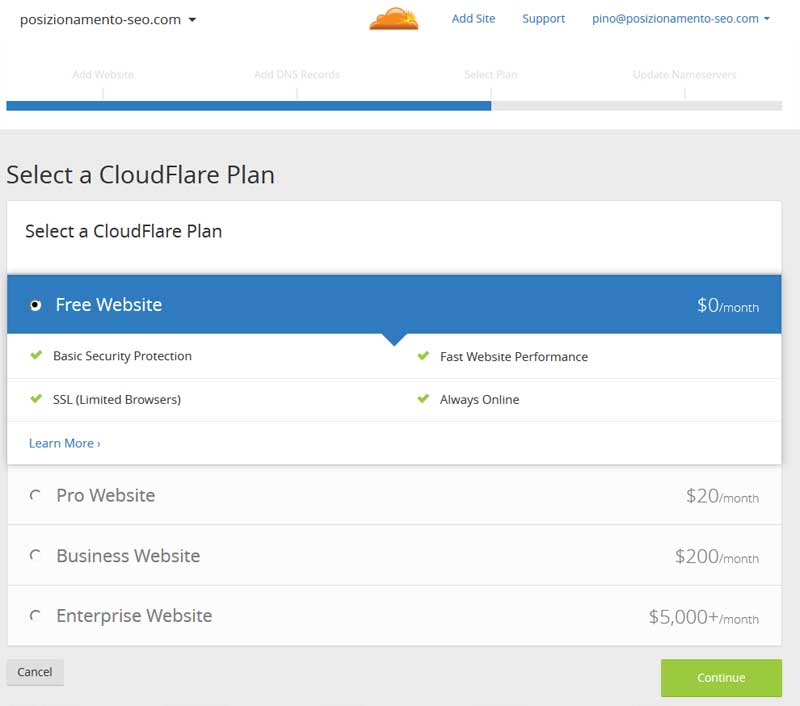
selezione piano cdn

Selezioniamo poi il piano che vogliamo attivare, nel mio caso per questo tutorial ho scelto quello gratuito. Naturalmente in seguito potremo passare ai piani a pagamento, nel caso ci sia necessità di investire budget in maggiore velocità e performance per il nostro sito web. Premiamo nuovamente sul bottone Continue.

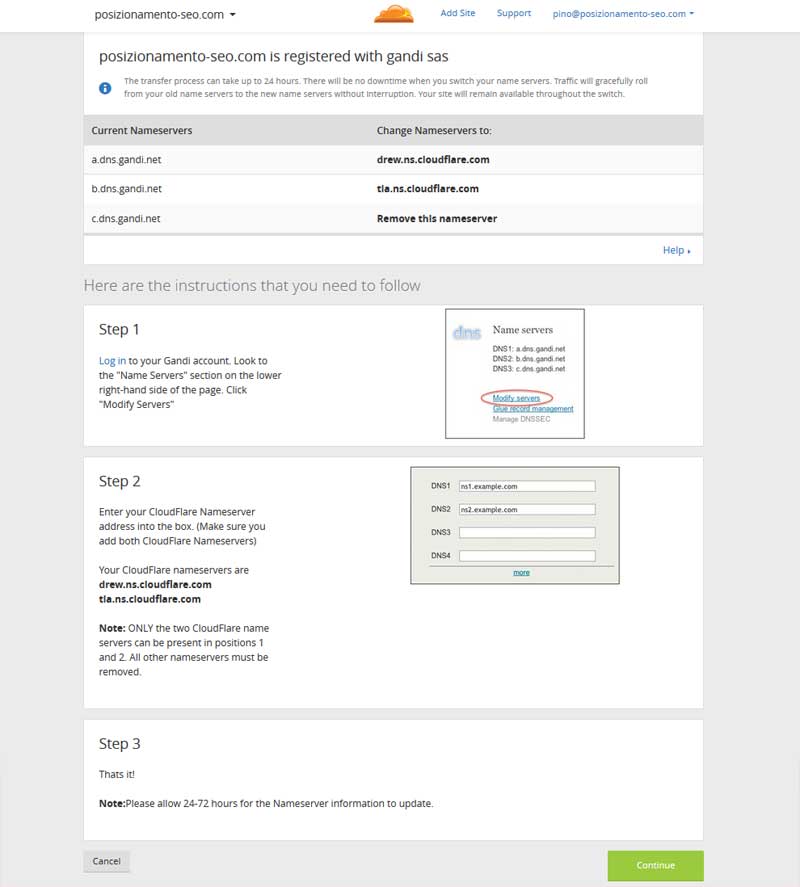
Cloudflare ci dirà quindi che è necessario modificare i DNS del nostro dominio affinché il servizio possa funzionare.

Modifica dei DNS

Siamo arrivati al passaggio più “complicato”: la modifica dei DNS del nostro sito. Questa operazione è necessaria in quanto permetterà all’utenza di transitare da una copia cache delle pagine del nostro sito, presente su un nodo di cloudflare, in fase di richiesta di un nostro contenuto.

La modifica dei DNS varia da host ad host e per effettuarla è necessario intervenire nel pannello con cui abbiamo configurato il nostro dominio per farlo puntare al nostro server. Non è quindi una modifica da effettuare sul sito.

Cloudflare ci viene in aiuto, infatti per gli host più utilizzati nel mondo fornisce un tutorial alla modifica dei DNS.

dns cloudflare

E’ questo il caso di gandi.net, il provider su cui ho configurato il dominio di posizionamento-seo.com, che utilizzerò come esempio in questo articolo. Per gli altri host dovrete fare riferimento al vostro provider o nel caso sia fornita alle linee guida presenti su Cloudflare.

Come cambiare i DNS su Gandi.net

Gandi.net, di cui ho parlato di sfuggita in alcuni miei precedenti articoli, offre un pannello semplificato per la gestione dei DNS e di cui Cloudflare presenta degli screenshot per spiegare nel dettaglio la procedura.

La ripropongo qui, riscritta da me in Italiano.

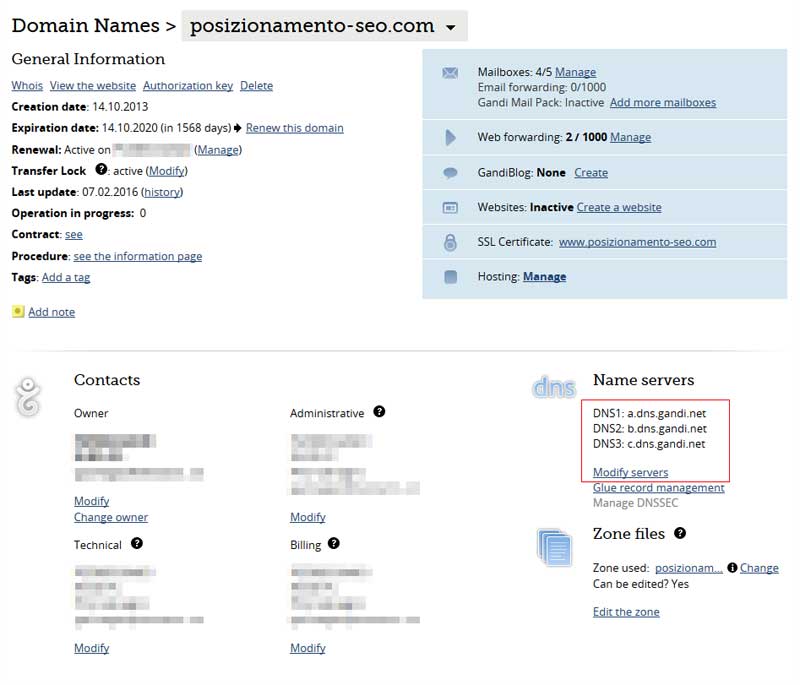
Dopo aver fatto accesso alla piattaforma di gestione del nostro host, con una utenza con diritti di modifica in relazione al dominio di cui vogliamo aggiornare i DNS apriamo la schermata relativa al dominio.

dns gandi

Sulla sinistra, nella zona dedicata ai Name servers premiamo su Modify servers.

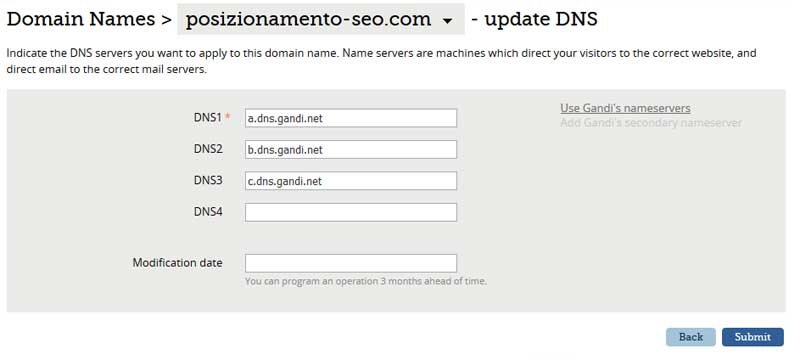
gandi update dns

Si aprirà così una nuova pagina con i DNS che stiamo utilizzando in questo momento e che, se non abbiamo già modificato in passato, sono quelli standard di Gandi.

a.dns.gandi.net
b.dns.gandi.net
c.dns.gandi.net

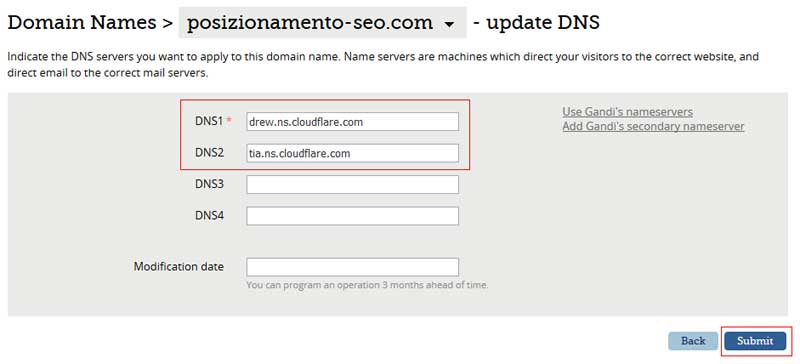
Inseriamo quindi i DNS proposti da Cloudflare e premiamo su Submit per effettuare l’aggiornamento.

drew.nd.cloudflare.com
tia.nd.cloudflare.com

gandi update dns cloudflare
gandi dns change

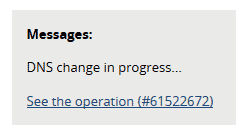
Ritorneremo così nella schermata procedente, ma un box ci dirà che i DNS si stanno aggiornando. La procedura impiegherà qualche minuto, ma attenzione la propagazione effettiva dei DNS avverrà solamente dopo 24 ore, periodo durante il quale il sito potrebbe non venire visualizzato.  In realtà questoproblema non dovrebbe sussitere perché ci penserà Cloudflare a far visualizzare una copia del nostro sito mentre i DNS si propagano.

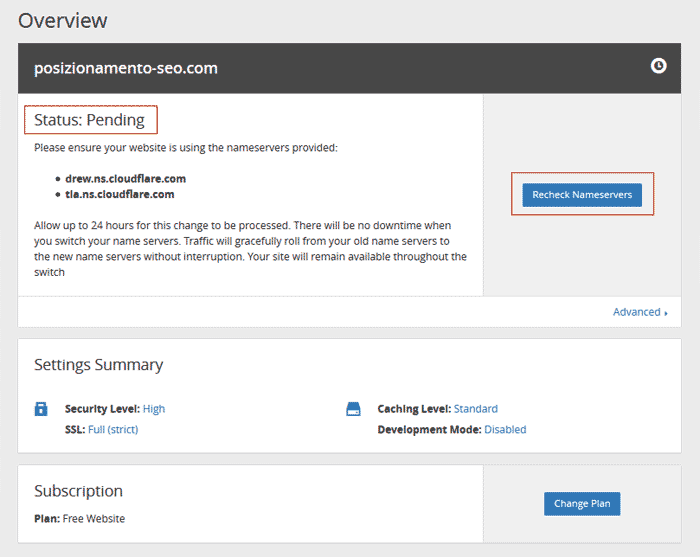
Torniamo quindi sul pannello di gestione del nostro sito su Cloudflare, dove vedremo che la CDN è in attesa di poter utilizzare i nuovi DNS e se vogliamo sfidare la sorte, possiamo provare a forzare un nuovo controllo sui DNS in uso premendo sul bottone Recheck Nameservers.

nuova analisi dns cdn
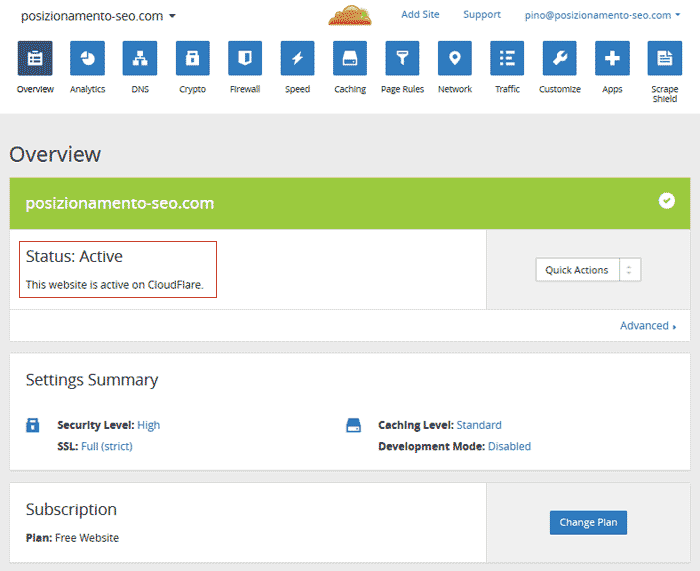
successo configurazione dns-cloudflare

Una volta che Cloudflare si aggancerà ai nuovi DNS del nostro dominio potremo incominciare a configurare il nostro account.

Configurazione dell’account di Cloudflare

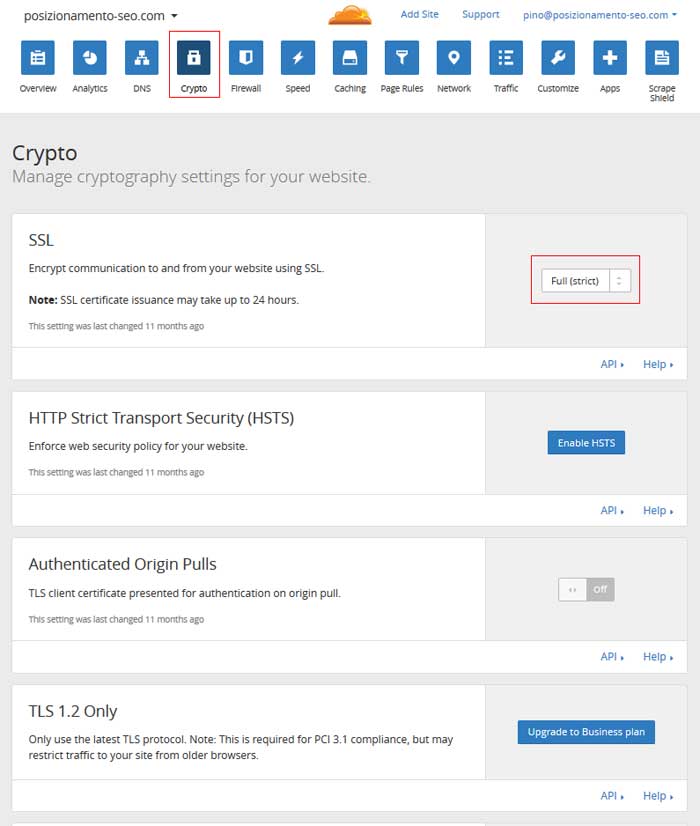
In particolare se, come nel mio caso, il nostro dominio ha un certificato SSL proprietarioè necessario configurare bene la sezione relativa alla Criptazione. Per questo, nel pannello di Cloudflare, premiamo su Cripto. Per far si che i nostri certificati SSL non vengano filtrati dalla CDN, rendendo il nostro sito NON visualizzabile per colpa di un errore SSL sarà necessario selezionare nel box dedicato alla SSL come tipo di comunicazione di criptazione, nella select a discesa presente, l’impostazione Full (strict). Il resto lo lasciamo come di default, quindi:

  • HTTP Strict Transport Security (HSTS) non abilitata (il bottone Enable HSTS deve rimanere blu)
  • Authenticated Origin Pulls lo lasciamo su Off
  • in ultimo non è necessario creare dei certificati con Cloudflare
ssl gandi cloudflare
CDN certificati attivi

Dopo che Cloudflare avrà analizzato i nostri certificati SSL nel pannello, nella sezione dedicata a SSL, comparirà una label verde con scritto ACTIVE CERTIFICATE e più in basso potremo vedere i certificati acquisiti.

SSL e Cloudflare

Anche nella versione gratuita Cloudflare permette di creare gratuitamente dei certificati SSL per il nostro dominio. Sappiate che è possibile utilizzare questa opzione per crittare la comunicazione con il nostro dominio e trasformare il nostro dominio in HTTPS, al fine di migliorare il ranking sul motore di ricerca Google.

In un prossimo articolo vedremo nel dettaglio la configurazione di Cloudflare per il piano free.

Analisi dei risultati

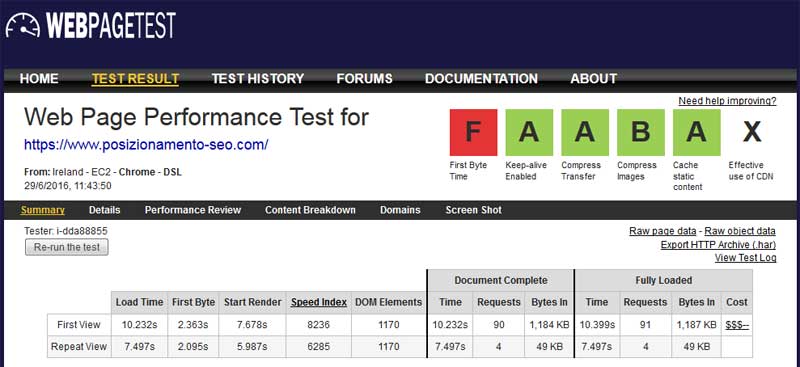
Analizziamo ora come è cambiata la perfomance di questo sito a seguito della configurazione di una CDN.

Analisi prima della configurazione della CDN

analisi velocita no cdn

Utilizzo per effettuare le analisi Web Page Test che oltre ad analizzare come vengono serviti i byte del mio sito nei differenti momenti mi segnala la presenza della CDN. Entrambi i test sono stati condotti facendo uscire la connessione da un server in Irlanda e simulando l’uso di browser Chrome dietro a connessione DSL.

Analisi dopo la configurazione della CDN

analisi velocita cdn

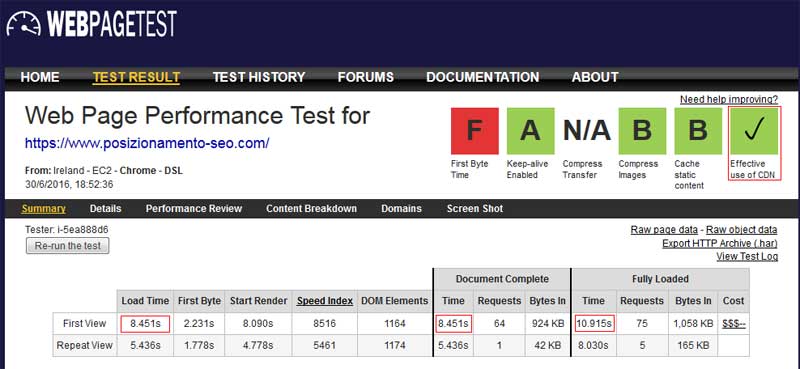
Come potete vedere nello screenshot qui sopra oltre al fatto che viene segnalata l’effettiva presenza della CDN a servire i miei contenuti sono notevolmente scesi, a livello di secondi:

  • il tempo di caricamento;
  • il tempo in cui viene servito il primo byte;
  • il tempo di caricamento del primo byte;
  • il tempo di carimento dell’intero documento;

Da notare che non viene più segnalata la presenza della compressione gzip delle immagini, pur se presente e configurata sul server.