I don't know what's the matter with people: they don't learn by understanding, they learn by some other way — by rote or something. Their knowledge is so fragile! (Feynman)
NOTE: Configuring authentication for SERVER mode.

Enter the email address and password to use for the initial pgAdmin user account:

Email address: admin@itzgeek.local
Password: xxxxxxxxx
Retype password: xxxxxxxxx
pgAdmin 4 - Application Initialisation
======================================
Restart the Apache web service.
systemctl restart httpd
My https configuration file for Apache
For CentOS 7:
<VirtualHost *:80>
        ServerName pg.saic.it
        Redirect permanent / https://pg.saic.it/pgadmin4/
</VirtualHost>
<VirtualHost *:443>
        ServerName pg.saic.it
        LoadModule wsgi_module modules/mod_wsgi.so
        SSLEngine on
        SSLCertificateFile /etc/ssl/certs/pg.saic.it.crt
        SSLCertificateKeyFile /etc/ssl/certs/pg.saic.it.key
        SSLCACertificateFile /etc/ssl/certs/saic.sslforfree.ca
        WSGIDaemonProcess pgadmin processes=1 threads=25
        WSGIScriptAlias /pgadmin4 /usr/lib/python2.7/site-packages/pgadmin4-web/pgAdmin4.wsgi

        <Directory /usr/lib/python2.7/site-packages/pgadmin4-web/>
                WSGIProcessGroup pgadmin
                WSGIApplicationGroup %{GLOBAL}
                <IfModule mod_authz_core.c>
                        # Apache 2.4
                        Require all granted
                </IfModule>
                <IfModule !mod_authz_core.c>
                        # Apache 2.2
                        Order Deny,Allow
                        Deny from All
                        Allow from 127.0.0.1
                        Allow from ::1
                </IfModule>
        </Directory>
</VirtualHost>
if you have this error in your Apache log file : Fatal Python error: PyEval_AcquireThread: NULL new thread state
is because mod_python have to removed from the modules
After the installation when you do an update the steps are: A, B, C
To update an existing domain with adding a new subdomain
--expand tells Certbot to update an existing certificate with a new certificate that contains all of the old domains and one or more additional new domains. With the --expand option, use the -d option to specify all existing domains and one or more new domains.
1. Verifica l’elenco dei certificati gestiti da Certbot
Esegui il comando seguente per visualizzare tutti i certificati attualmente gestiti da Certbot:
certbot certificates
Troverai una lista dei certificati attivi, con informazioni come il dominio principale, eventuali domini aggiuntivi, e il percorso del file di configurazione.
2. Identifica il certificato da rimuovere
Annota il nome del dominio o il cert name associato al certificato che desideri rimuovere.
3. Elimina il certificato
Per rimuovere il certificato e la sua configurazione dai rinnovi automatici, usa il comando:
certbot delete --cert-name nome-certificato
Sostituisci nome-certificato con il valore del Cert Name trovato nel passo precedente.
Our series of blockchain tutorials has been very popular. The tutorials have been read tens of thousands of times and several hundred people have joined our Telegram community to give us feedback and ask questions.
The most common feedback people give is that our blog posts are useful in making complicated blockchain concepts simple and understandable. However, they are missing Peer-to-Peer functionality.
We’ve done everything from showing you how to code Proof of Work to letting you know how IPFS works. However, in each of our tutorials, we relied on a central server to show you these concepts.
We will now show you how to run a simple blockchain in a truly decentralized, Peer-to-Peer fashion. Let’s get started!
Background
What is Peer-to-Peer (P2P)?
In true Peer-to-Peer architecture, you don’t need a central server to maintain the state of a blockchain. For example, when you send your friend some Bitcoin, the “state” of the Bitcoin blockchain should be updated so your friend’s balance increases and your balance decreases.
There isn’t a central authority like a bank that maintains the state. Instead, all the nodes in the Bitcoin network that wish to maintain a copy of the Bitcoin blockchain update their copies of the blockchain to include your transaction. That way, as long as 51% of the nodes in the network “agree” on the state of the blockchain, it maintains its fidelity. Read more on this consensus concept here.
In this tutorial, we will rework our post, Code your own blockchain in less than 200 lines of Go! so it uses a Peer-to-Peer architecture instead of a central server. We strongly recommend reading it before proceeding. It will help you understand the forthcoming code.
Let’s get coding!
Coding a P2P network is no joke. It has a ton of edge cases and requires a lot of engineering to make it scalable and reliable. Like any good engineer, we will first see what tools are available as a starting point. Let’s stand on the shoulders of giants.
Luckily, there is an excellent P2P library written in Go called go-libp2p. Coincidentally, it is made by the same folks who created IPFS. If you haven’t checked out our IPFS tutorial, take a look here (don’t worry it’s not mandatory for this tutorial).
Warning
As far as we can tell, this go-libp2p library has 2 drawbacks:
Setup is a pain. It uses gx as a package manager that we don’t find very convenient.
It appears to still be under heavy development. When working with the code, you will encounter some minor data races. They have some kinks to iron out.
Don’t worry about #1. We’ll help you through it. #2 is a bigger issue but won’t affect our code. However, if you do notice data races, they are most likely coming from the underlying code of this library. So make sure to open an issue and let them know.
There are very few modern, open source P2P libraries available, particularly in Go. Overall, go-libp2p is quite good and it’s well suited to our objectives.
Setup
The best way to get your code environment set up is to clone this entire library and write your code within it. You can develop outside the environment they provide but it requires knowing how to work with gx. We’ll show you the easy way. Assuming you already have Go installed:
go get -d github.com/libp2p/go-libp2p/...
navigate to the cloned directory from above
make
make deps
This gets you all the packages and dependencies you need from this repo through the gx package manager. Again, we don’t like gx as it breaks a lot of Go convention (besides, why not just stick with go get?) but it’s worth the inconvenience to use this otherwise nice library.
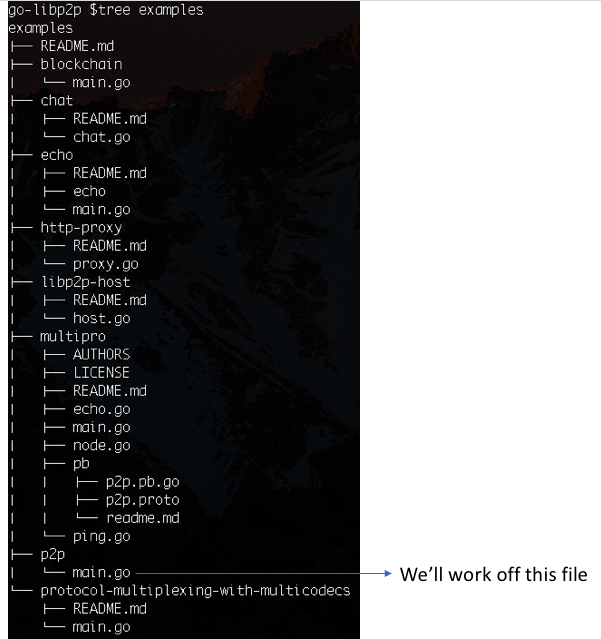
We’re going to develop inside the examples subdirectory. So let’s create a directory under examples called p2p with
mkdir ./examples/p2p
Then navigate to your new p2p folder and create a main.go file. We will be writing all our code in this file.
Your directory tree should look like this:
Open up your main.go file and let’s start writing our code!
Imports
Let’s make our package declaration and list our imports. Most of these imports are packages provided by the go-libp2p library. You’ll learn how to use each of them throughout this tutorial.
The spew package is a simple convenience package to pretty print our blockchain. Make sure to:
go get github.com/davecgh/go-spew/spew
Blockchain stuff
Remember! Read this tutorialbefore proceeding. The following section will be much easier to understand after reading it!
Let’s declare our global variables.
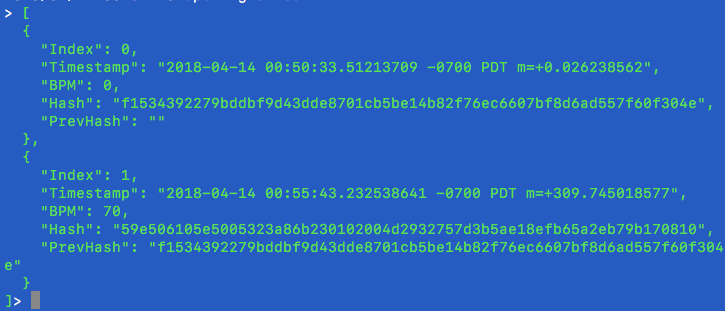
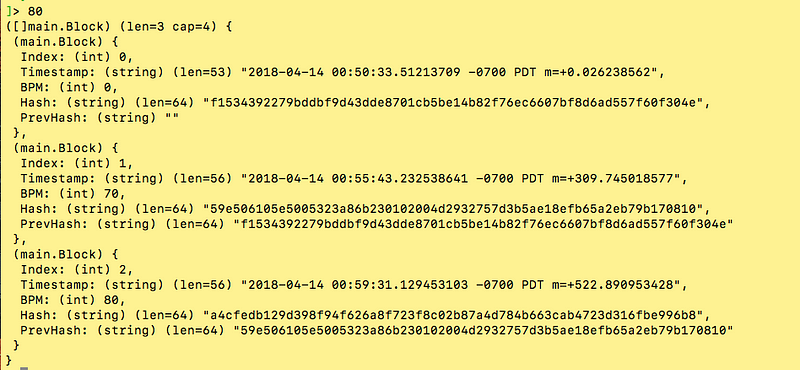
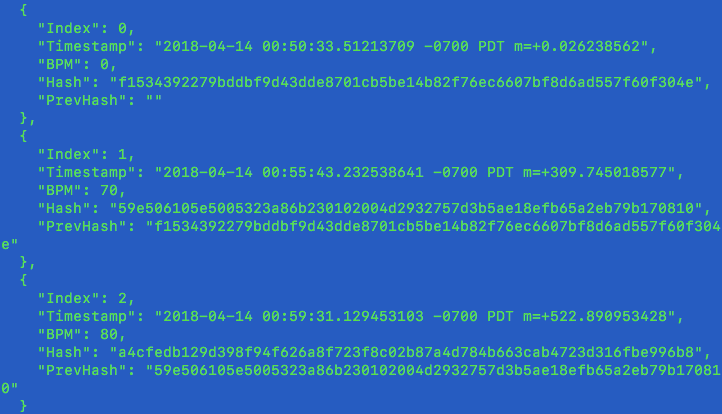
Block is the transaction info we want. We are using BPM (beats per minute, or our pulse rate) as the key data point going in each block. Take your pulse rate and remember that number. Remember, we’re a healthcare company so we’re not going to use boring financial transactions as our block data 😉
Blockchain is our “state”, or the latest blockchain, which is just a slice of Block
We declare a mutex so we can control for and prevent race conditions in our code
Write out the following blockchain-specific functions.
isBlockValid checks to see that the chain of hashes in each block of the blockchain is consistent
calculateHash uses sha256 to hash raw data
generateBlock creates a new block to be added to the blockchain, with the necessary transaction info inside it
P2P Stuff
Host
Now we get to the meat of our tutorial. The first thing we want to do is write the logic that allows a host to be created. When a node runs our Go program, it should act as a host to which other nodes (or peers) can connect. Here’s the code. Don’t stress, we’ll walk you through it 🙂
Our makeBasicHost function takes 3 arguments and returns the host and an error (which is nil if no errors are encountered).
listenPort is the port we specify in our command line flags that other peers connect to
secio is a boolean that turns on and off secure data streams. It’s generally a good idea to use it. It stands for “secure input/output”
randSeed is an optional command line flag that allows us to supply a seed to create a random address for our host. We won’t use this but it’s nice to have.
The function’s first if statement determines whether the seed was supplied and generates keys for our host accordingly. We then generate our public and private keys so our host stays secure. The opts section starts to construct the address to which other peers can connect.
The !secio part bypasses encryption but we’re going to use secio for security so this line doesn’t apply to us for now. It’s fine to have this option though.
We then create the host and finalize the addresses that other peers can connect to. The log.Printf part at the end is the helpful console message we print that tells a new node how to connect to the host we just created.
We then return the fully created host to the caller of the function. We now have our host!
Stream handler
We need to allow our host to deal with incoming data streams. When another node connects to our host and wants to propose a new blockchain to overwrite our own, we need logic to determine whether or not we should accept it.
When we add blocks to our blockchain, we want to broadcast it to our connected peer, so we need logic to do that as well.
Let’s create the skeleton of our handler.
We create a new ReadWriter since we need both read and write and we spin up separate Go routines to deal with the read and write logic.
Read
Let’s create our readData function first.
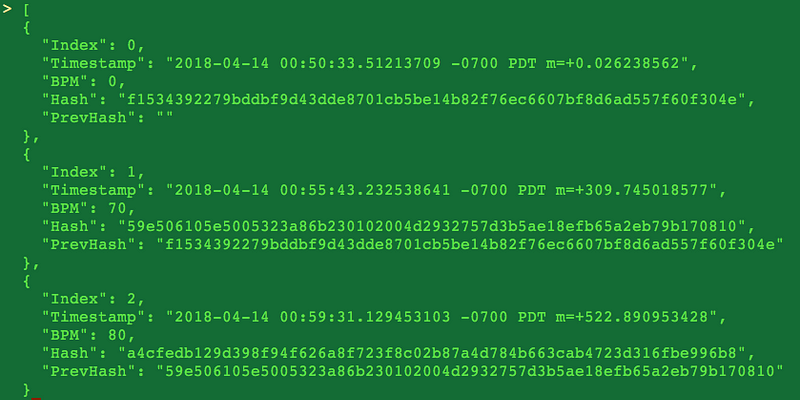
Our function is an infinite loop since it needs to stay open to incoming blockchains. We parse our incoming blockchain from a peer which is just a string of a JSON blob with ReadString. If it’s not empty (!= “\n”) we Unmarshal the blob first.
Then we check to see if the length of the incoming chain is longer than the blockchain we’re storing ourselves. For our purposes, we are simply going by blockchain length to determine who wins out. If the incoming chain is longer than ours, we’ll accept it as the latest network state (or the latest, “true” blockchain).
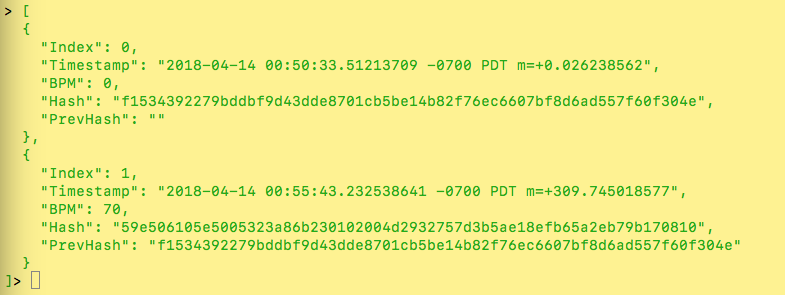
We’ll Marshal it back into a JSON format so it’s easier to read then we print it to our console. The fmt.Printf command prints in a different color so it’s easy for us to know it’s a new chain.
Now we’ve accepted our peer’s blockchain, if we add a new block to our blockchain, we need a way to let our connected peer know about it, so they can accept ours. We do that with our writeData function.
Write
We start the function off with a Go routine that broadcasts the latest state of our blockchain every 5 seconds to our peers. They’ll receive it and throw it away if the length is shorter than theirs. They’ll accept it if it’s longer. Either way, all the peers are constantly getting their blockchains updated by the latest state of the network.
We now need a way to create a new block with the pulse rate (BPM) we took earlier. We create a new reader with bufio.NewReader so it can read our stdin (console input). We want to be able to continually add new blocks so we put this in an infinite loop.
We do a little bit of string manipulation to make sure the BPM we type in is an integer and properly formatted to be added as a new block. We go through our standard blockchain functions (see the “Blockchain stuff” section above). Then we Marshal it so it looks pretty, print it to our console to verify with spew.Dump. We then broadcast it to our connected peer with rw.WriteString.
Great! We’ve now finished our blockchain functions and most of our P2P functions. We’ve created our handler, and the read and write logic to deal with incoming and outgoing blockchains. Through these functions we’ve created a way for each peer to continually check the state of their blockchain against each other and collectively, they all get updated to the latest state (longest valid blockchain).
All that’s left now is wiring up our main function.
Main function
Here is our main function. Have a look through it first then we’ll go through it step by step.
We start off by creating a Genesis block, which is our seed block for our blockchain. Again, if you read our previous tutorial this should be review.
We use the go-libp2p library’s logger to handle logging with SetAllLoggers. This is optional.
We then set all our command line flags.
secio we covered previously and allows for secure streams. We’ll make sure to always use this by setting the flag when running our program.
target lets us specify the address of another host we want to connect to, which means we’re acting as a peer to a host if we use this flag.
listenF opens the port we want to allow connections to, which means we’re acting as a host. We can be both a host (receive connections) and a peer (connect to other hosts). This is what makes this system truly P2P!
seed is the optional randomness seeder used to construct our address that other peers can use to connect to us.
We then create a new host with the makeBasicHost function we created earlier. If we’re only acting as a host (i.e. we’re not connecting to other hosts) we specify that with if *target == “” , fire up our handler with the setStreamHandle function we made earlier and that’s the end of our listener code.
If we do want to connect to another host we move onto the else section. We set our handler again, since we’re acting as a host AND a connecting peer.
The next few lines deconstruct the string we supply to target so we can find the host we want to connect to. This is also called Decapsulation.
We end up with the peerID and target address targetAddr of the host we want to connect to and add that record into our “store” so we can keep track of who we’re connected to. We do that with ha.Peerstore().AddAddr
We then create our connection stream to the peer we want to connect to with ha.NewStream. We want to be able to receive and send them streams of data (our blockchain) so just like we did in our handler, we create a ReadWriterand spin up separate Go routines for readData and writeData. We finish off by blocking with an empty select statement so our program doesn’t just finish and quit.
Wahoo!
Guess what? We’re done! I know that was a bit of a handful but considering how complicated P2P engineering is you should proud that you made it to the end! That wasn’t too bad was it?
Now let’s get to what we’re all here for and try this out! We’re going to be using 3 separate terminals to act as individual peers.
Before starting the app, do yourself a favor and go to the root directory of go-libp2p and run make deps again. This makes sure your dependencies are in order. Again, this library uses the annoying gx package manager and we have to do a couple things to make it play nice.
Go back to your working directory.
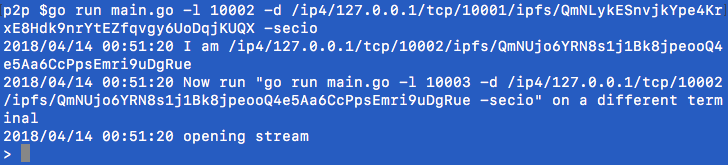
On your first terminal, go run main.go -l 10000 -secio
Terminal 1
Follow the instructions that say “Now run…”. Open up a 2nd terminal, go to the same directory and go run main.go -l 10001 -d <given address in the instructions> -secio
Terminal 2
You’ll see the first terminal detected the new connection!
Terminal 1
Now following the instructions in the 2nd terminal, open up a 3rd terminal, go to the same working directory and go run main.go -l 10002 -d <given address in the instructions> -secio
Terminal 3
Check out the 2nd terminal, which detected the connection from the 3rd terminal.
Terminal 2
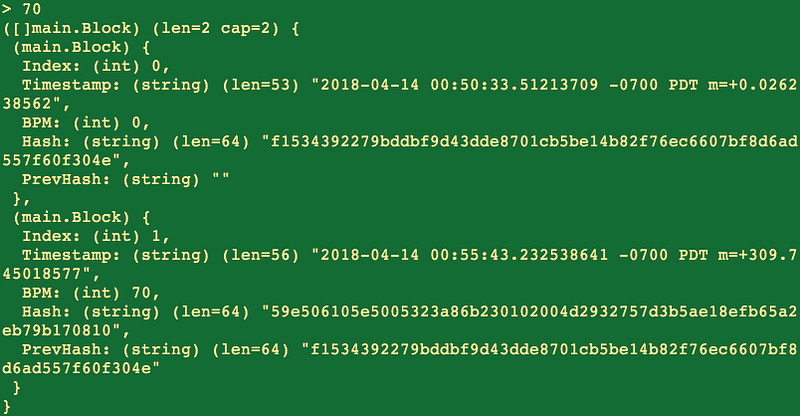
Now let’s start inputting our BPM data. Type in “70” in our 1st terminal, give it a few seconds and watch what happens in each terminal.
Terminal 1Terminal 2Terminal 3
What just happened here? It’s really cool so let’s think it through.
Terminal 1 added a new block to its blockchain
It then broadcast it to Terminal 2
Terminal 2 compared it against its own blockchain, which only contained its genesis block. It saw Terminal 1 had a longer chain so it replaced its own chain with Terminal 1’s chain. Then it broadcast the new chain to Terminal 3.
Terminal 3 compared the new chain against its own and replaced it.
All 3 terminals updated their blockchains to the latest state with no central authority! This is the power of Peer-to-Peer.
Let’s test it again but this time allow Terminal 2 to add a block. Type in “80” into Terminal 2.
Terminal 2Terminal 1Terminal 3
Awesome! As expected, this time Terminal 2 added a new block and broadcast it to the rest of the network. Each of the peers ran its own internal checks and updated their blockchains to the latest blockchain of the network!
Next Steps
Take a breather and enjoy your handy work. You just coded up a simple but fully functioning P2P blockchain in just a few hundred lines of code. This is no joke. P2P programming is very complicated, which is why you don’t see many simple tutorials out there on how to create your own P2P network.
There are some improvements and caveats to take away. Challenge yourself and try to tackle one or more of these:
As mentioned, the go-libp2p library is not perfect. We were careful to ensure our own code has minimal (if any) data races but while we were testing this library we noticed they had some data races in their code. It didn’t affect the results we were expecting to see but be extra cautious if you’re using this external library in production. Let them know about bugs you find as their library is a work in progress.
Try incorporating consensus mechanisms to this tutorial. We just did a simple check to see which blockchain was the longest, but you could incorporate either our Proof of Work or Proof of Stake tutorials to have a more robust check.
Add persistence to the code. Right now, for simplicity, we shut down all the nodes if you kill one of them. You can leave all other nodes running even if one closes. If one node dies, it should be able to relay the info in its Peer Store to its connected nodes so they can connect to each other.
This code hasn’t been tested with hundreds of nodes. Try writing a shell script to scale many nodes and see how performance is affected. If you notice any bugs, make sure to file an issue or submit a pull request in our Github repo!
Look into node discovery. How do new nodes find existing nodes? Here’s a good place to start.
That’s all for now!
Where will your P2P journey go from here? Between this and our other tutorials, you have almost all the building blocks to create your own blockchain from scratch. That’s serious stuff!
Make sure to let us know what you think by joining our Telegramchat. This is the best place to get help with your code or just geek out with us on blockchain topics! We have a very vibrant community that would love to hear from you. Ask us anything!
Here are the links to our other tutorials. Read them all!
From this post : Consensus Algorithms: The Root Of The Blockchain Technology
Every day we see new blockchain technology surfacing in our midst. No matter how much we try to grasp the latest technology, they always have something new to offer to the table. Ever wonder what the root of all these blockchain technologies is? Well, consensus algorithms are the primary root of these revolutionary techs.
Consensus algorithms are what that makes all these blockchain consensus sequence different from one another. Blockchain network facilities millions and millions of people in the same space. So, how come they never interfere with one another or exist mutually?
The answer is in the architecture of the blockchain network. The architecture is cleverly designed, and consensus algorithms are at the core of this architecture.
If you really want to know how blockchain consensus sequence works then you have to dive in much more in-depth than you think. That’s why I’ll be covering all there is to know about consensus algorithms in this guide. So, let’s get on with it!
Consensus algorithms are a decision-making process for a group, where individuals of the group construct and support the decision that works best for the rest of them. It’s a form of resolution where individuals need to support the majority decision, whether they liked it or not.
In simple terms, it’s just a method to decide within a group. Let me clear it up with an example. Imagine a group of ten people that want to make a decision about a project that benefits them all. Every one of them can suggest an idea, but the majority will be in favor of the one that helps them the most. Others have to deal with this decision whether they liked it or not.
Now imagine the same thing with thousands of people. Wouldn’t that drastically make it way more difficult?
Consensus algorithms do not merely agree with the majority votes, but it also agrees to one that benefits all of them. So, it’s always a win for the network.
Blockchain consensus models are methods to create equality and fairness in the online world. The consensus systems used for this agreement is called a consensus theorem.
These Blockchain consensus models consist of some particular objectives, such as:
Coming to an agreement: The mechanism gathers all the agreements from the group as much as it can.
Collaboration: Every one of the group aims toward a better agreement that results in the groups’ interests as a whole.
Co-operation: Every individual will work as a team and put their own interests aside.
Equal Rights: Every single participant has the same value in voting. This means that every person’s vote is important.
Participation: Everyone inside the network needs to participate in the voting. No one will be left out or can stay out without a vote.
Activity: every member of the group is equally active. There is no one with more responsibility in the group.
Different Types of Consensus Algorithms Infographic
Chapter-2: The Problem with Byzantine Fault Tolerance
Byzantine Fault Tolerance is a system with a particular event of failure. It’s called Byzantine Generals’ problem. You can best experience the situation with a distributed computer system. Many times there can be malfunctioning consensus systems.
These components are responsible for the further conflicting information. Consensus systems can only work successfully if all the elements work in harmony. However, if even one of the component in this system malfunctions the whole system could break down.
Malfunctioning components always cause inconsistency to the Byzantine Fault Tolerance system, and that’s why it’s not ideal for to use these consensus systems for a decentralized network.
Experts call it “The Byzantine Generals’ Problem.” Still confused?
Let me clear it up with a consensus example.
Imagine there’s a group of generals, where each one of them owns the Byzantine army. They are going to attack a city and take control, but for that, they’ll need to decide how to attack.
You might think it’s effortless. However, there’s a slight difficulty. The generals can only communicate through a messenger, and some traitorous generals will try to sabotage the whole attack.
They can send unreliable information through the messenger, or the messenger can even become the enemy here.
The messenger could also intentionally sabotage by delivering the wrong information.
This is why the problem needs to be dealt with cautiously. First of all, somehow we have to make every general come to a mutual decision and secondly, make sure that even the slightest number of traitors can’t cause the whole mission to fail.
It might seem quite simple to you; however, it’s not. According to research, it will take 3n+1 generals to deal with n traitors. It will take four generals to cope with a single traitor, which makes it somewhat tricky.
Chapter-3: Why We Need Consensus Algorithms?
The main problem with Byzantine is to reach on an agreement. If even a single fault occurs, nodes can’t come to an agreement or have a higher difficulty value.
On the other hand, Consensus algorithms don’t really face this type of problem. Their primary target is to reach a specific goal by any means. The Blockchain consensus models are much more reliable and fault tolerant than Byzantine.
This is why when there could be contradictory results in a distributed system; it’s best to use consensus algorithms for a better output.
Chapter-4: Blockchain: The Skeleton of Organizing Data of the Decentralized Network
Now let’s take a look inside the blockchain technology to get a better view of the whole network.
It’s a new way to organize the database.
Can store everything that changes according to the network.
All the data get arranged in a block like matter.
However, you won’t see any decentralization in the blockchain itself. This is because blockchain doesn’t provide the decentralizing environment. That’s why we need consensus algorithms to make sure the system is fully decentralized.
So, blockchain Technology would only allow you to create a different structured database, but it won’t carry out the decentralization process. This is why blockchain is considered the skeleton of the whole decentralized network.
Chapter-5: Consensus Algorithms: The Soul of the Network
The method is quite simple really. These Blockchain consensus models are just the way to reach an agreement. However, there can’t be any decentralized system without common consensus algorithms.
It won’t even matter whether the nodes trust each other or not. They will have to go by certain principles and reach a collective agreement. To do so, you have to check out all the Consensus algorithms.
So far we haven’t found any specific Blockchain algorithms that work for every blockchain Technology. Let’s take a look at the different Consensus algorithms to get a better view of the whole picture.
Chapter-6: Different Types of Consensus Algorithms
List of All Consensus Algorithms
Proof-of-Work
Proof-of-Stake
Delegated Proof-of-Stake
Leased Proof-Of-Stake
Proof of Elapsed Time
Practical Byzantine Fault Tolerance
Simplified Byzantine Fault Tolerance
Delegated Byzantine Fault Tolerance
Directed Acyclic Graphs
Proof-of-Activity
Proof-of-Importance
Proof-of-Capacity
Proof-of-Burn
Proof-of-Weight
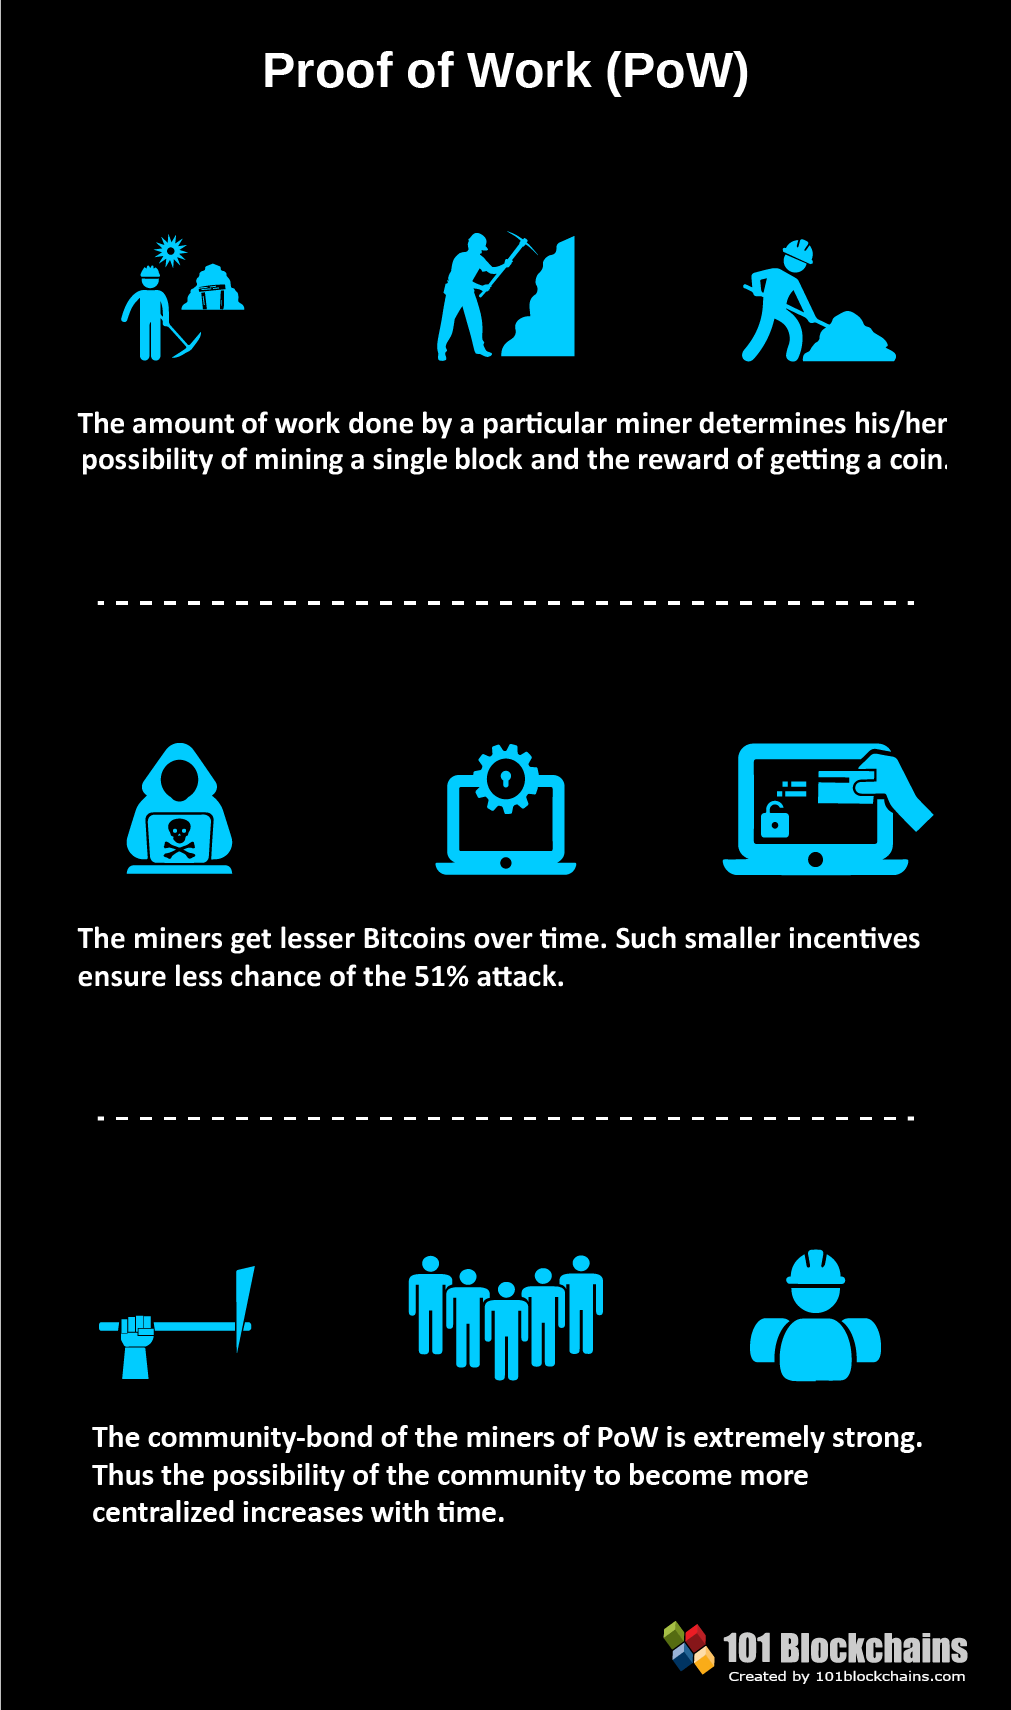
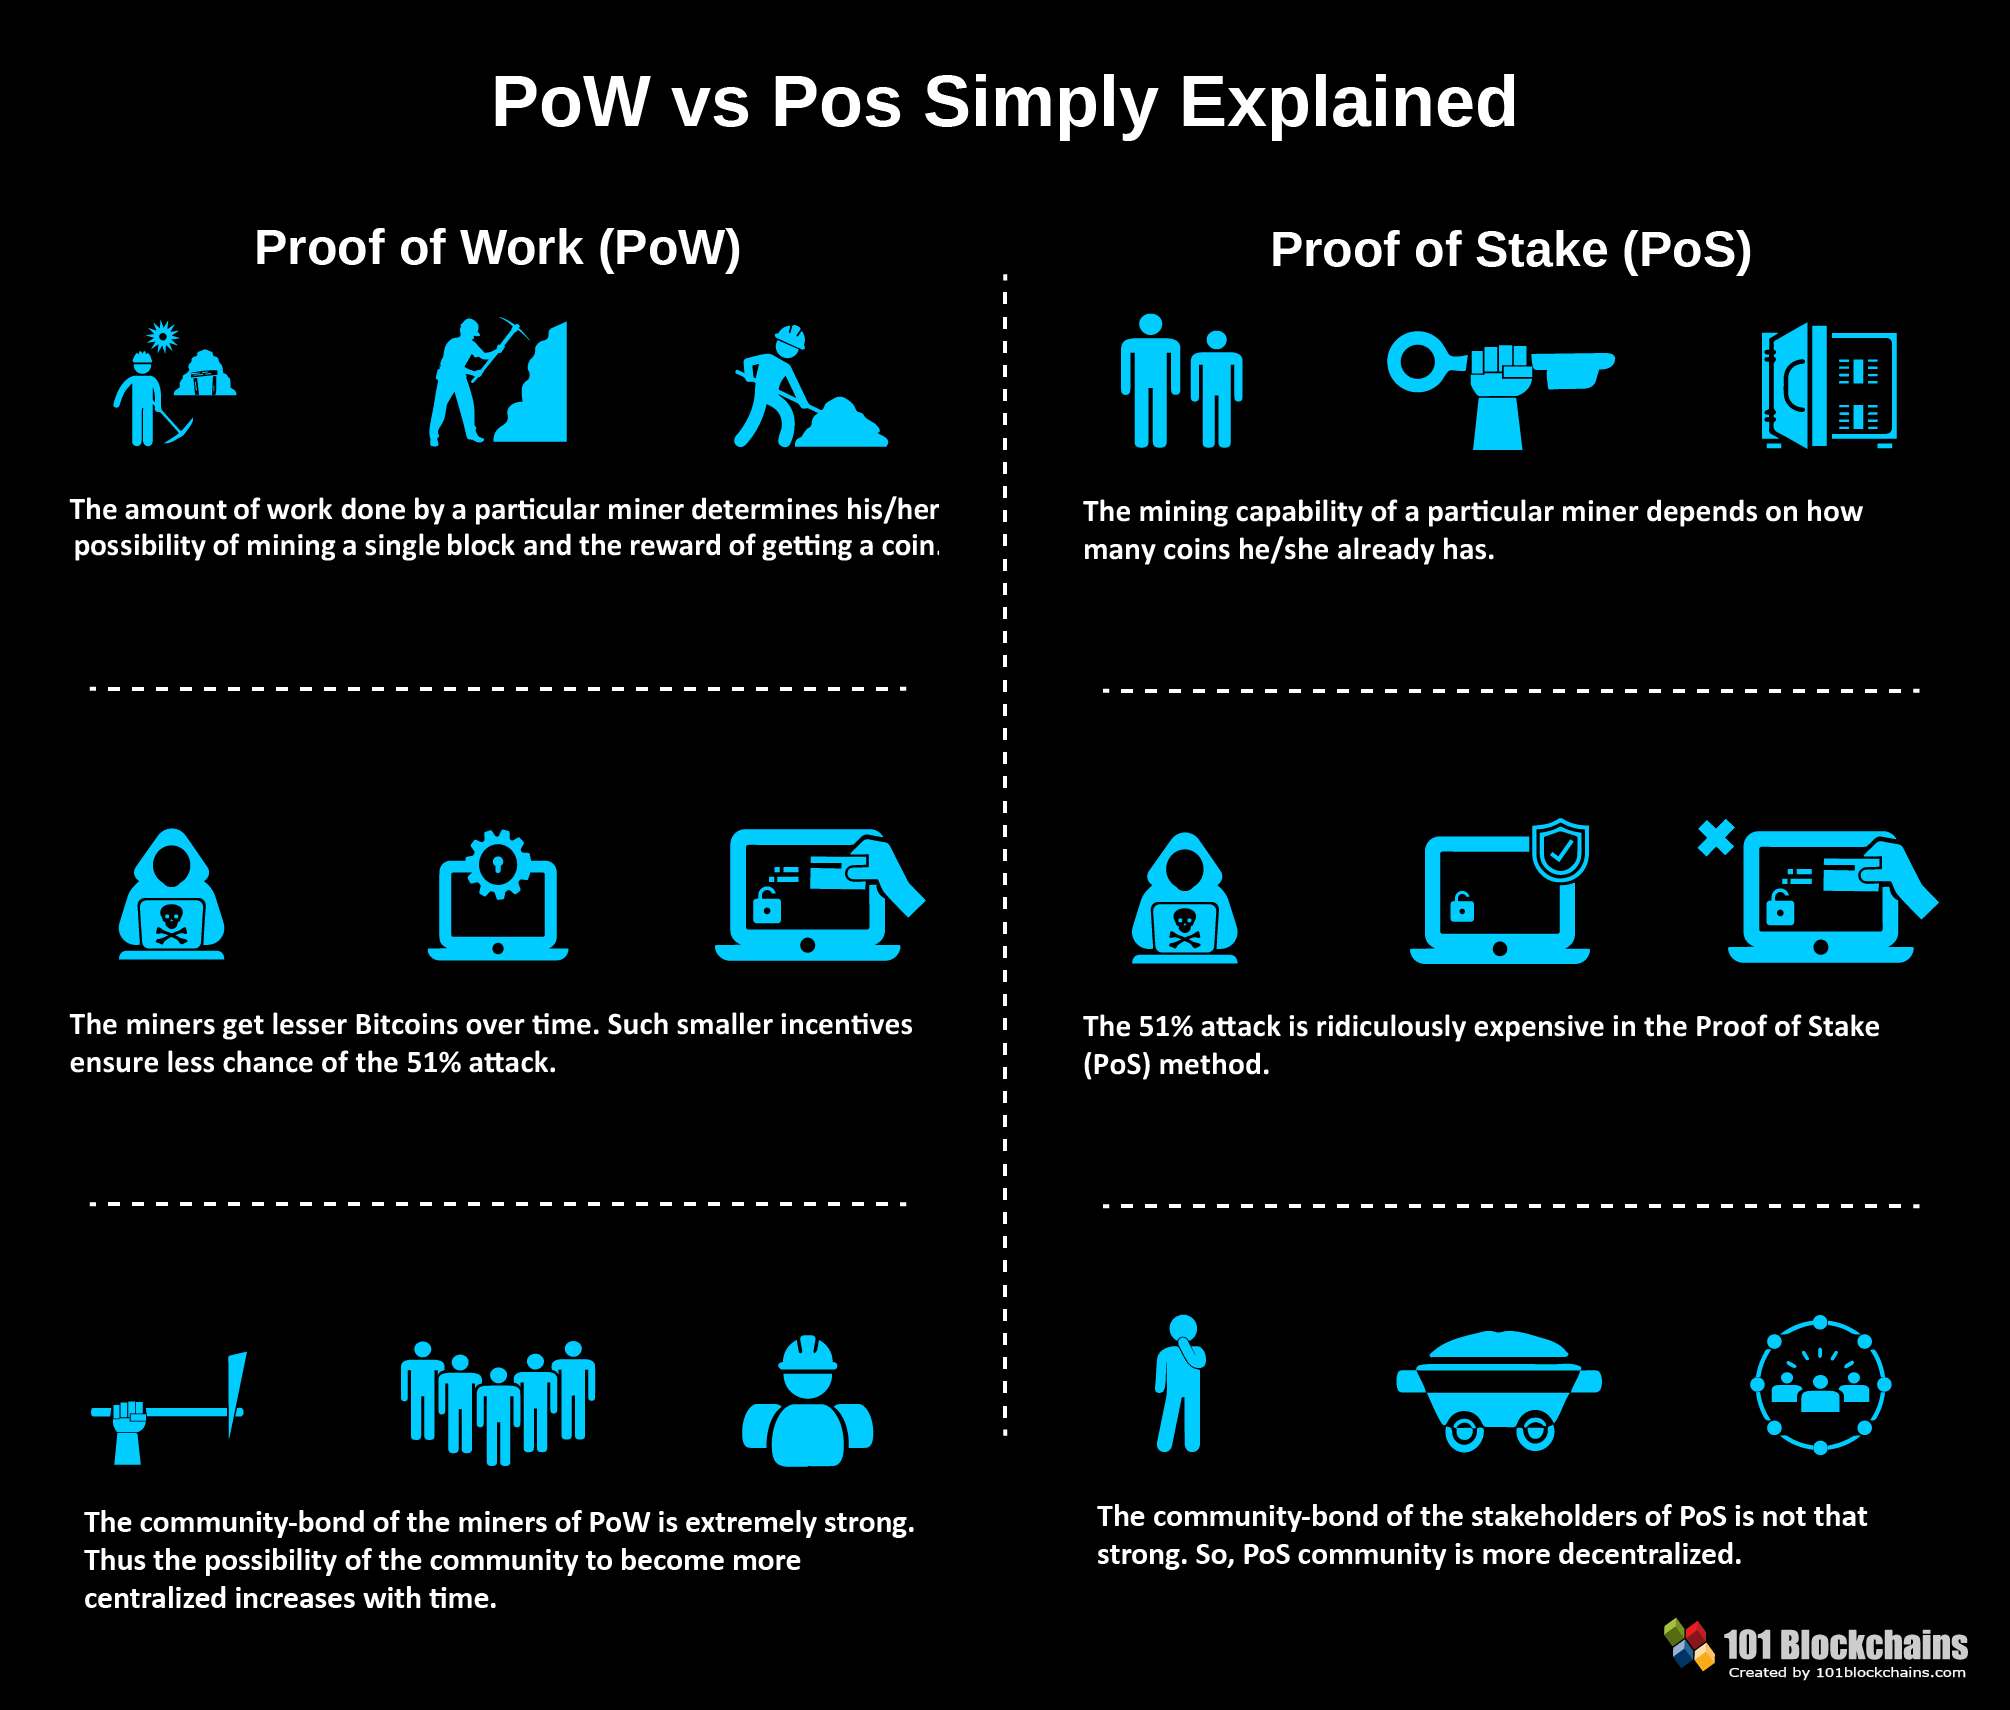
Proof of Work
Proof of work is the first Blockchain algorithms introduced in the blockchain network. Many blockchain Technologies uses this Blockchain consensus models to confirm all of their transactions and produce relevant blocks to the network chain.
The decentralization ledger system collects all the information related to the blocks. However one needs to take special care of all the transactions blocks.
This responsibility falls upon all the individual nodes called miners and the process they use to maintain it is called mining. The central principle behind this technology is to solve complex mathematical problems and easily give out solutions.
You might be thinking what a mathematical problem is?
These mathematical problems require a lot of computational power, to begin with. For example, Hash Function or knowing how to find out the output without the input. Another one is that integer factorization, and it also covers tour puzzles.
This happens when the server feels like it has a DDoS attack and to find it out the consensus systems requires a lot of calculation. It’s where the miners come in handy. The answer to the whole problem with the mathematical equation is called the hash.
However proof of work has certain limitations. The network seems to grow a lot, and with this, it needs lots of computational power. This process is increasing the overall sensitivity of the system.
Why Has the System become So Sensitive?
Blockchain consensus sequence relies mostly on accurate data and information. However, the speed of the system lacks tremendously. If a problem becomes too complicated, it takes a lot of time to generate a block.
The transaction gets delayed, and the overall workflow pauses. If the block generation problem can’t be solved within a specific time then generating blocks will become a miracle.
However, if the problem becomes too easy for the system, then it will be prone to DDoS attack. Also, the solution needs to be further checked precisely because not all the nodes can check for possible errors.
If they could then network would lack the most important feature – transparency.
How Is Proof of Work Implemented On A Blockchain Network?
First of all, the miners will solve all the puzzles and after that new blocks will get created and confirm transactions after that. It’s impossible to say how complex a puzzle can be.
It highly depends on the maximum number of users, the minimum current power and the overall load of the network.
New blocks come with Hash Function, and each of them contains the hash function of the previous block. By this way, the network adds an extra layer of protection and prevents any type of violations. Once a miner solves the puzzle, a new block gets created, and the transaction is confirmed.
Where Exactly Is Proof of Work Consensus Algorithm Blockchain Used?
The most popular one is bitcoin. Bitcoin introduced this type of consensus algorithm blockchain before any other cryptocurrencies. The Blockchain consensus models allowed any kind of change in the complexity of the puzzle, based on the overall power of the network.
It takes about 10 minutes to create a new block. Other cryptocurrency consensus example such as Litecoin also offers the same system.
Another blockchain algorithms user, Ethereum, used proof of work in almost 3-4 big projects on the platform. However, Ethereum has moved on to Proof of stake.
Why Blockchain Technology Uses Proof of Work In The First Place?
You must be wondering why different blockchain technology use proof of work to begin with.
It’s because PoW offers DDoS protection and lowers the overall of stake mining. This blockchain algorithms offer a fair deal of difficulty for the hackers. The system requires a lot of computational power and effort.
This is the reason hacker can hack into the Blockchain consensus models, but it would take a lot of time and complexity which will make the cost too high.
On the other hand, no miners can decide on the overall network because the decision making doesn’t depend on the amount of money. It depends on how much computational power you have to form new blocks.
What Are the Main Issues With Proof of Work Consensus Algorithm?
Not all the Consensus algorithms are perfect; Proof of work isn’t that different either. It has a lot of perks, but it also comes with a lot of flaws. Let’s see what the main flaws of the system are.
Greater Energy Consumption
Blockchain network contains millions and millions of designed microchip that hashes constantly. This process requires a lot of juice.
Bitcoin currently offers 20 billion hashes per second. The miners on the network use some specifically designed microchip to hash. This procedure enables the network to add a layer of protection from botnet attack.
The security level of blockchain network based on proof of work requires a lot of energy, and it’s intensive. The greater consumption is becoming a problem in a world where we are running out of energy – miners on the system have to face a large sum of cost due to the electricity consumption.
The best solution to this problem would be a cheap source of energy.
Centralization of Miners
With the energy problem, proof of work will move toward cheaper electricity solutions. However, the main problem would be if a bitcoin miner-manufacturer rises. Within a certain time, the manufacturer can become more power hungry and try to create new rules in the mining system.
This situation will lead towards centralization within the decentralized network. That’s why it’s another great problem these Blockchain algorithms is facing.
What About the 51% Percent Attack?
Let me clarify what the 51% attack really means. This attack would mean a possible control of majority users and taking over most of the mining power. In this scenario, the attackers will get enough power to control everything in the network.
They can stop other people from generating new blocks. Attackers can also receive rewards based on their tactics.
Let me clarify it with a consensus example.
Imagine a scenario where Alice is sending Bob some cryptocurrency through the blockchain network. However, Alice is involved in the attack, and Bob is not. The transaction takes place, but the attackers don’t let any amount of money to be transferred by starting a fork in the chain.
In other cases, the miners will join up in one of the branches. They will have the most computational power combined on those blocks. That’s why other blocks with shorter life get rejected. As a result, Bob won’t receive the money.
However, this isn’t the profitable solution. It will take up a lot of mining power, and after the incident getting exposure, users will start to leave the network, and eventually, the trading cost will come down.
Proof of Stake
What Is Proof of Stake?
Proof of stake is a consensus algorithm blockchain that deals with the main drawbacks of the proof of work algorithm. In this one, every block gets validated before the network adds another block to the blockchain ledger. There is a little bit of Twist in this one. Miners can join the mining process using their coins to stake.
The proof of stake is a new type of concept where every individual can mine or even validate new blocks only based on their coin possession. So, in this scenario the more coins you have, the better your chances are.
How Does It Work?
In this consensus algorithm, the minors get previously chosen.
Although the process is entirely random, still not every minor can participate in the staking. All the miners of the network are randomly chosen. If you have a specific amount of coins stored previously in your wallet, then you will be qualified to be a node on the network.
After being a node, if you want to be qualified for being a miner you will need to deposit a certain amount of coin, after that there will be a voting system for choosing the validators. When it’s all done, the miners will stake the minimum amount required for the special wallet staking.
The process is quite simple really. New blocks will get created proportional to the number of coins based on the wallet. For example, if you own 10% of all the coins, then you get to mine 10% new blocks.
There are many blockchain technologies that use a variety of proof of stake consensus algorithm. However, all of the algorithms work the same for mining new blocks every miner will receive a block reward as well as a share of the transaction fees.
What Happens In The Proof of Stake Pooling?
There are other ways to participate in the stacking. If the staking amount is too much high, then you can join a pool and earn profits through that. You can do it in two ways.
First of all, you can loan your coin to another user who will participate in the pool and then share the profit with you. However, you will need to find a reliable person for staking with.
Another method would be to join the pool yourself. This way everyone participating in that specific pool will divide the profit based on the stake amount.
Proof of Stake: What are the Benefits?
First of all, this type of consensus algorithms doesn’t require any amount of heavy hardware backup. You only need a functional computer system and a stable internet connection. Any person who has enough coins on the network will also be able to validate transactions.
If a person invests in the network, it won’t depreciate over time like other investments. The only thing that will affect the profit is the price fluctuations. Proof of stake consensus algorithm blockchain is much more energy efficient then proof of work. It doesn’t even need too much power consumption.
It also reduces the threat of a 51% attack.
Even though proof of stake seems quite lucrative than Proof of work, still there is one significant disadvantage. The main drawback of the system is that full decentralization is not possible ever.
This is simply because only a handful of nodes get to participate in the staking on the network. Individuals with the most coins will eventually control most of the system.
Popular Cryptocurrencies Using Proof of Stake as the Base of the Blockchain Technology
PIVX
It’s another privacy coin that has next to zero transaction fees. PIVX was previously forked from Dash. However, it moved to proof of stake from proof of work. They also ensure better staking by using a master node for distributing blocks.
If you want to start taking PIVX, then you have to download the official wallet and then sync it with the blockchain. After that, you have to transfer some of the currency into the wallet and then leave it connected like that.
NavCoin
Many cryptocurrencies forked the original blockchain consensus sequence of Bitcoin; NavCoin is one of them. The project is a completely open source. They also migrated to proof of stake earlier than most cryptocurrencies.
To get the maximum benefit your computer will need to be connected to the network for a more extended period. As proof of stake is exceptionally lightweight, you can leave it running for a more extended period without any worries.
Stratis
It’s another blockchain consensus sequence that runs on proof of stake. The services get mainly made for businesses. Corporations can use it to build their own dApps without their very own blockchain network.
The platform offers app development in the side chains that prevent any sort of network lags. They started off as a proof of work project. However, they eventually moved on to proof of stake.
Delegated Proof of Stake is a variation of the typical proof of stake. The system is quite robust and adds a different form of flexibility to the whole equation.
If you want fast, efficient, decentralized consensus algorithms then Delegated Proof of Stake would be the best way to go. The issue of the stakeholders gets fully solved here in a democratic way. Every component on the network can become a delegate.
Here, instead of miners or Validators, the nodes are called delegates. By determining block production, this system can make a transaction within just one second! Moreover, this system was designed to ensure all level of protection against regulatory problems.
Witnesses Validating All Signatures
Usually, witnesses are free from regulations and other neutral words. Standard witness in the traditional contracts has a special place for witnesses to validate. They just make sure that individuals are supposed to get in contact at a specified time.
In DPOS, witnesses can generate blocks of information. There also is a concept of voting to elect the top witnesses. The voting only occurs when the system thinks it’s fully decentralized.
All the witnesses are paid right after it produces a block. The rate gets previously selected through a voting system.
Special Parameter Change in Elected Delegates
Just like witnesses, delegates get also chosen. Delegates are used for changing the overall network parameters. With delegates, you’ll get access to transaction fees, block intervals, block sizes and witness pay.
To change a parameter in the network, a majority of delegates need to vote for the same thing. However, delegates won’t get paid like witnesses.
Changing the Typical Rule
To run the system smoothly, it’s necessary to add different features now and then. However, the process of adding this feature can’t get done without a potential stakeholder. Witnesses can come together and change the policies, but they aren’t programmed to do so.
They need to stay neutral and only the employees of the stakeholders. So, initially, everything depends on the stakeholders.
Risk of Double Spend Attack
In DPOS, the risk of double spending is reduced to a great extent. This can occur when a blockchain network fails to include a previously spent transaction in the database.
The network can check up on its health without anyone’s help and can detect any sort of loss. In this way, it ensures 100% transparency in the database.
The Transactions Are Done As Proof of Stake
Although the system is a variation of proof of stake, still the core transaction system runs entirely on the proof of stake algorithm. The transaction process of the Proof of Stake ensures an added layer of protection against faulty consensus systems.
Who Uses Delegated Proof of Stake?
Lisk is one of the popular names in the market now. The blockchain platform offers a platform for developers to start making decentralized JavaScript-based application without a hassle.
It has a lot of elements common to Ethereum. However, the system uses Delegated proof of stake instead of proof of stake.
Staking works differently with this one.
Leased Proof-Of-Stake (LPoS)
Another twist to the classic Proof of Stake is the leased proof of stake. The new consensus algorithm blockchain was introduced to us by Waves platform. Just like any other blockchain technology platform, Waves also ensures to offer a better catch with a limited amount of power consumption.
The original proof of stake had some limitations for staking. Individuals with a limited amount of coins might never actually participate in the staking ever. To maintain the network successfully, only a handful of an individual with more coins to offer is left behind.
This process allows the system to create a centralized community within a decentralized platform, which is apparently not the desired one.
In leased proof of stake, the smallholders can finally get their chance of staking. They can lease their coins to the network and take the benefit from there.
After the introduction to the new Leased Proof of Stake, the situation changed completely. The limitations of the previous system can now get solved without any hassles. The main purpose of Waves platform was to help out small time investors.
People with a small number of coins in their wallet would never get a chance to get the benefits like the big fishes. This way it totally establishes the main theme of the consensus algorithms – transparency.
Proof of Elapsed Time (PoET)
PoET is one of the best consensus algorithms. This particular algorithm is used mainly on permissioned blockchain network where you’ll have to get permission for accessing the network. These permissions networks need to decide on the mining rights or voting principles.
To make sure that everything runs smoothly the PoET algorithms uses a particular tactic for covering transparency into the whole network. The Consensus algorithms also ensure a secure login into the system, as the network requires identification before joining the miners.
Needless to say, this consensus algorithm gives a chance to pick the winners using fair means only.
Let’s see what the main strategy of this awesome consensus sequence is.
Every individual on the network has to wait for an amount of time; however, the time limit is totally random.
The participant who has finished his/her fair share of waiting time will get to be on the ledger to create a new block.
To justify these scenarios the algorithm has to consider two facts.
Whether the winner actually chose the random number in the first place? He or She could choose a random short time and get the win first.
Did the individual really wait the specific time he/she were assigned?
PoET depends on a special CPU requirement. It’s called Intel Software Guard Extension. This Software Guard Extension helps to run unique codes within the network. PoET uses this system and makes sure the winning is purely fair.
The Intel SGX System
As the consensus algorithms use SGX system to verify the fairness of the pick, let’s take a deeper look into the system.
First of all, a special hardware system creates an attestation for using a particular trusted code. The code is set up in a secure environment. Any external party can use this attestation to verify whether it’s tamper-free or not.
Second of all, the code runs in an isolated area on the network where no one can interact with it.
The first step is necessary to prove that you are truly using the trusted code on the network and not some other random trick. The main network can’t ever find out if the first step doesn’t even run properly.
The second step prevents any user from manipulating the system into thinking that he/she is running the code. The second step ensures the security of the algorithm.
The Trusted Code
Let me simplify the outlines of the code.
Joining the Blockchain Network
A new user will firstly download the trusted code in the blockchain.
After he/she starts the process, they will get a special key pair.
Using that key pair, the user can send the SGX attestation to the network and request for access.
Taking Part in the Lottery Systems
Individuals will get a signed timer from the trusted code source.
After that, that individual will need to wait until the time given to him completely elapses.
Lastly, the individual will get a certification for completing the required task.
The protocol also ensures a different level of protections based on the SGX. This system counts how many times a user wins the lottery. By doing this, they would know whether the SGX of the individual user is compromised or not.
PBFT mainly focuses on the state machine. It replicates the system but gets rid of the main Byzantine general problem. Now, how does it do that?
Well, the algorithm assumes from the start that there could be possible failures in the network and some independent nodes can malfunction at certain times.
The algorithm is designed for asynchronous consensus systems and further optimized in an efficient way to deal with all the problem.
Moreover, all the nodes inside the system gets arranged in a specific order. One node is selected as the primary one, and others work as the backup plan. However, all the nodes inside the system work in harmony and communicate with one another.
The communication level is pretty high because they want to verify every information found on the network. This gets rid of the unreliable information problem.
However, with this new process, they’re able to find out if even one of the node gets compromised. All of the nodes reach an agreement through majority voting.
The Benefits of PBFT Consensus Algorithm
Practical Byzantine Fault Tolerance algorithms share some interesting facts with us. The model was primarily designed for practical use cases, and they are extremely easy to implement. Thus, PBFT possesses a certain advantage over all other consensus algorithms.
No Need for Confirmation:
The transactions on this network work a bit differently. It can finalize a transaction without any type of confirmation as we see in the PoW system.
If the nodes agree on a specific block, then it gets finalized. This is due to the fact that, all the authentic nodes communicate with each other at the same time and come to an understanding of the specific block.
Reduction in Energy:
The new model offers a good amount of reduction in consumption of power than PoW. In the PoW, every block needed individual PoW round. However, in this model, not every miner is solving the typical hashing algorithm.
That’s why the system doesn’t need that much of computational power.
Drawbacks of the System
Although PBFT provided a lot of advantages and promising facts, still it happens to have quite a lot of disadvantages. Let’s see what they are.
Communication Gap:
The most important factor of this algorithm is the communication among the nodes. Every node on the network has to make sure that the information they gather is solid. However, the Consensus algorithms only happen to work efficiently for a smaller group of nodes.
If the group of nodes increases to a great extent, the system may find it hard to keep track of all the nodes and can’t communicate with every single one of them.
The paper is backing this model up states to use MACs and other digital signature to prove the authenticity of the information. That being said, MACs aren’t capable of handling the blockchain type network system, so using it would be a significant loss at the end.
The digital signature can be a good point but maintaining security with all these communication nodes would become harder and harder as the number of the node will increase.
Sybil Attack:
PBFT is quite vulnerable to Sybil attacks. In these attacks, they can manipulate a group of nodes together, and by doing so, they compromise the whole network. This also gets far worse with larger networks, and the scalability of the system gets reduced.
If one can use this model with another consensus algorithms, then they will probably get a solid secured combo.
Simplified Byzantine Fault Tolerance (SBFT)
In SBFT, the system works a bit differently.
First, a block generator will collect all the transaction at a time and validate them after batching them together in a new type of block.
In simple terms, a block will gather all the transactions, batch them accordingly into another block and then finally validate all of them together.
The generator applies certain rules that all the nodes follow to validate all the transactions. After that, a block signer will validate them and add their very own signature. That’s why if any of the blocks miss even one of the keys then it will get rejected.
Different Stages of Simplified Byzantine Fault Tolerance
The stage starts with the creation phase, where the asset user will produce a greater number of unique asset IDs.
After that, in the submission phase, the user submits all the IDs on the platform.
Then begins the validation phase, where the IDs get specified terms of use cases.
Once they are all signed up, they will get stored and transferred to different accounts. The transactions could happen with the help of smart contracts.
Lastly, the transactions become live.
Another cool feature of this awesome system is the Account manager, which helps in many stages. The primary target is to store all the assets securely. Account manager also stores all the transactional data. The manager can contain all sorts of combinational assets for different types of users.
You can think of these as digital wallets. Using these digital wallets, you’ll be able to transfer your assets from the wallet and even receive some of them in return. You can also use the account manager to form the smart contacts, and when the specific requirement gets met, it releases the funds.
But how does the ownership of assets flow?
Well, they actually use a push model that contains addresses and Assets ID to send them their earned asset.
Security and Privacy
SBFT is for a private network where confidentiality is the priority of the network. The platform was designed in a fashion to expose sensitive information but with certain limitations. That’s why the system uses three types of techniques, such as Zero-knowledge proofs, one-time use addresses, and encrypted metadata.
One Time Use Addresses:
Every time a user wants to receive some assets in his/her wallet, they will be assigned one-time use addresses. Every address differs from each other and thus, prevents any other user to intercept with the transaction.
Zero Knowledge Proof:
Zero knowledge proof is used to conceal all the components of a transaction. However, the entire network would still be able to validate the integrity. This gets done with the help of Zero-Knowledge Proofs where one party will prove their authenticity to another party.
In this way, only the receiver and the sender will be able to see the components of the transaction.
Metadata Encryption:
The metadata of the transitions is also encrypted to ensure further security. The network will allow the usage of keys to validate the authenticity. However, for better protection, the keys will alter every 2-3 days.
Also, all of them are kept separated and on different parts of the data network. So, if one of them gets hacked, one can use other keys to generate more unique keys. Managing these keys and rotating them every few days is necessary for ensuring the integrity of these consensus algorithms.
Chain, a blockchain based platform uses SBFT to validate all of their transaction on the network. Other than that, they are also using an HSM (Hardware Security Module) for an industry level security. By using HSMs, they ensure extra security without the need for any single point failure.
Delegated Byzantine Fault Tolerance (dBFT)
There is no debate on the fact that Proof-of-Work and Proof-of-Stake are the most widely known consensus algorithms. While a lot of the blockchain ecosystem follows these two common algorithms, some are trying to impose newer and more advanced consensus systems. Among these pioneer blockchain brands, NEO’s name is sure to come.
With the thriving growth in the last 12 months, NEO is now the hotcake in the industry. The Chinese brand has shown quite the potential. And why wouldn’t they? They are the inventor of the advanced consensus theorem – Delegated Byzantine Fault Tolerance (dBFT).
A Popular Blockchain Technology: NEO
This is one of the popular cryptocurrencies on the market now. It’s sometimes referred to as China’s Ethereum. The primary focus of the network is to create a smart economy where are you can share your digital assets at a low price.
NEO uses Delegated Byzantine Fault Tolerance to validate all the transactions. If you stake your NEO, you will able to generate GAS. GAS is the platforms main circulating currency. You will have to pay up to a certain amount of GAS fee for every transaction. That’s why the more NEO you will stake, the more GAS you will get.
However, this staking is a bit different than PoS.
Many exchanges offer a pooling system. However, it’s best to use the official NEO wallet instead of another storage wallet.
Before we begin our analysis on the dBFT, we must let you know the faults of the father of this algorithm – Byzantine Fault Tolerance consensus algorithm.
The Flaws of Byzantine Generals!
A major flaw of the system occurs when we witness any kind voting and the outcome of it. But how? To understand the fault better, you need to grasp this following consensus example.
You already know that the nodes that follow the dBFT consensus algorithms are known as the army. An army of nodes have a single general, and they follow the command of their general always.
Now imagine, the Byzantine army is planning to attack Rome and take it over. Let’s consider there are nine generals of the Byzantine army and the generals have surrounded the city and prepared to attack! They can take over Rome only if the generals plan to attack or retreat following a unified, single strategy.
Here’s the catch! The generals have a unique nature – they will follow the decision that has 51% majority regarding vote. There is another twist here; the generals are not taking decision sitting a table. Instead, they are positioned in different locations and use couriers to transfer messages.
The Four Threats!
Four possible ways could help the Romans to retain their throne –
First, the Romans could try bribing the generals and gain their favor. The general who would take the bribe will be considered as a “Traitorous General.”
Second, any general could take a wrong decision that is against the collective will. These generals are better known as “Improperly Functioning General.”
Third, the messenger or the courier could take bribes from the Romans and deliver misleading decisions to the other generals.
And lastly, fourth, the Romans could kill the courier or the messenger to sabotage the communication network of the generals.
So, the Byzantine Fault Tolerance has four significant faults that make the consensus algorithms imperfect.
How Delegated Fault Tolerance (dBFT) Changes the Scene?
Don’t take a sweat; NEO has shown us a better way to solve the faults of the Byzantine generals. Now let’s take a look at that Delegated Byzantine Fault Tolerance of which NEO is so proud of! The dBFT mainly focuses on solving the existing model in two ways – better scalability and enhanced performance.
The Speakers and the Delegates!
We will again use another example to clarify the model of dBFT. Let’s consider that the Byzantine army has an elected leader rather than a bureaucratic general. This chosen leader will act as the delegate of the band of the army.
You could think of the generals being replaced by these elected delegates democratically. Even the army can disagree with these delegates and choose another delegate to replace the prior one.
This limits the bureaucratic power of the generals, and no general could betray the overall army. So, the Romans now cannot just bribe and buy the generals to work for them.
In dBFT, the elected delegates have to keep track of the decisions of the individual nodes. A decentralized ledger notes down all the decisions of the nodes.
The army of nodes also elects a Speaker to share their common and unified thought to the delegate. To pass a new law, the Speakers share the idea of the army of the nodes to the delegates, and at least 66% of the delegates have to agree on the motion. Otherwise, the proposed law will not pass.
If a motion doesn’t get the approval of the 66% of the delegates, the proposal gets denied, and a new motion is proposed until they reach to a consensus. This process protects the whole army from traitorous or the betraying generals.
The Dishonest Speakers
There are still two possible scenarios that could hamper the integrity of the dBFT blockchain consensus protocol – a dishonest speaker and a dishonest delegate.
The dBFT blockchain consensus protocol also gives us the solution to these scenarios. As we have said, a ledger keeps the decisions of the nodes in a single place. The delegates can verify if the speaker is truly speaking for the army. If the speaker’s proposal and the ledger don’t unite, the 66% of the delegates will reject the speaker’s proposal and ban the speaker altogether.
The Dishonest Delegates
The second scenario has an honest speaker and probably betraying delegate. Here, the honest delegates and the honest speaker will try to achieve a 66% majority and diminish the efforts of the dishonest delegate.
So, you could see how the Delegated Byzantine Fault Tolerance (dBFT) overcomes the flaws of the Byzantine generals and the BFT consensus altogether. Surely, NEO deserves praise from all around the world for their effort to create a better consensus algorithm.
Directed Acyclic Graphs (DAG)
A lot of crypto-experts acknowledge Bitcoin as the blockchain 1.0 and Ethereum as the blockchain 2.0. But nowadays, we are seeing a new player in the market with even more modern technology.
Some are also saying that it is the blockchain 3.0. While a lot of contenders are fighting to get the title of blockchain 3.0, NXT is going to be ahead of the game with the application of Directed Acyclic Graphs also known as the DAG. Apart from NXT, IOTA and IoT Chain also adopts DAG to their system.
How Directed Acyclic Graphs (DAG) Works?
You could think of DAG as a consensus algorithm. But DAG is basically a form of data structure. While most of the blockchains are a “chain” of “blocks” containing data, DAG is a seamless graph where data gets stored topologically. DAG could come convenient handling specific problems like – data processing, routing, compression.
It takes about 10 minutes to create a block using the Proof-of-Work consensus algorithm. Yes, the PoW is a slowpoke! Rather than working on a single chain, DAG implements the “side-chains.” A side-chain allows different transactions to perform independently on multiple chains.
This will reduce the time of creating and validating a block. Well, actually, it dissolves the necessity of blocks altogether. Moreover, the mining seems to be a waste of time and energy too!
Here, all the transactions are directed and maintain a particular sequence. Moreover, the system is acyclic, meaning the chance of finding the parent node is zero as it a tree of nodes, not a loop of nodes. DAG is showing the world a possibility of blockchains without the blocks!
Basic Concepts of Directed Acyclic Graphs DAG
No More Double Spending
The traditional blockchain allows the mining of on single block at a time. There is a possibility that more than one miner will try to validate a block. This creates a likelihood of double spending.
Moreover, the situation might lead to soft even hard forks. The DAG validates a particular transaction based on the previous number of transactions. This makes the blockchain system safer and more robust.
Less Width
In other consensus algorithms, the transaction nodes get added to the whole network. This makes the width of the system bulkier. Whereas, DAG links the new transactions to the older transaction graph. This makes the entire network lean and more straightforward to validate a particular transaction.
Faster and Smarter
As DAG has blockless nature, it can handle transactions way faster. In fact, it makes the PoW and the PoS look like grandpas in a race.
Favorable to the Smaller Transactions
Not everyone is transacting millions over a single transaction. In fact, the smaller payments are more commonly witnessed. But the substantial payment fees of Bitcoin and Ethereum doesn’t seem that much friendly to the smaller amounts. On the other hand, DAG is perfectly suitable to the smaller ones because of the negligible transaction fees.
Chapter-7: Other Types of Consensus Algorithms
Proof-of-Activity
While people were debating the topic – Proof-of-Work vs. Proof-of-Stake, the creator of Litecoin and three other authors thought of something brilliant. They asked the world a simple question – why can’t combine the PoW and PoS instead of making them battle each other?
Thus, the idea of a fascinating hybrid came to the world – Proof-of-Activity. It combines the best two features – more secured against any attack and not a not power-hungry system.
How Does Proof-of-Activity Work?
In the Proof-of-Activity blockchain consensus protocol, the mining process starts just like the PoW algorithm. The miners solve a critical puzzle to get a reward. So, where is the crucial difference with PoW? In PoW, miners mine blocks that has a complete transaction.
In Proof-of-Activity, miners mine only the template of the blocks. Such a template has two things in them – the header information and the reward address for the miners.
Once, the miners mine these block templates; the system converts to the Proof-of-Stakes. The header information inside a block points to a random stakeholder. These stakeholders then validate the pre-mined blocks.
The more stack a validator holds, the chances of them approving a block increases. Only after the validation, that particular block gets into the blockchain.
This is how Proof-of-Activity uses the best of the two consensus algorithms to validate and add a block to the blockchain. Moreover, the network pays both the miners and the validators the fair share of the transactional fees. Thus the system acts against the “tragedy of the common” and creates a better solution for block validation.
The Impacts of Proof-of-Activity
One of the biggest threats a blockchain face is the 51% attack. The consensus theorem reduces the probability of the 51% attack to zero. It happens as neither the miners nor the validators can be the majority as the process would require equal contribution while adding a block to the network.
Although, some critics say that Proof-of-Activity blockchain consensus protocol has some severe flaws. The first one will be the massive amount of energy consumption due to the mining feature. Second, Proof-of-Activity doesn’t have any solution to put a stop to the double signing of the validators. These two significant flaws kind of makes the consensus theorem a bit back footed.
Two popular blockchains adopt the Proof-of-Activity – Decred and Espers. Still, they have some variations. In reality, Decred is getting considered as the more popular one than the Espers consensus theorem.
Proof-of-Importance
Next on our list comes the Proof-of-Importance blockchain consensus protocol. This consensus example came to be because of the famous name of NEM. The concept is a development of the Proof-of-Stake. Although, NEM introduced a new idea – harvesting or vesting.
The harvesting mechanism determines whether a node is eligible to be added to the blockchain or not. The more you harvest on a node, the more chances it gets to be added on the chain. In return for the harvesting, the node receives the transaction fees that the validator collects as the reward. To be eligible to harvest, you need to have at least 10,000 XEM on your account.
It solves out the major problem of Proof-of-Stake. In PoS, the richer gets more money compared to the validators having less money. For example, if you own 20% of the cryptocurrency, you can mine 20% of all the blocks on the blockchain network. This makes the consensus algorithms favorable to the wealthy.
Noticeable Characteristics of Proof-of-Importance
Vesting
The most intriguing feature of the consensus theorem is the vesting or the harvesting. As we have said, you need have at least 10,000 coins to be eligible for harvesting in the first place. Your Proof-of-Importance score depends on the harvested amount you have. Although, the consensus algorithms take into account the time period you have the coins in your pocket.
Transaction Partnership
The Proof-of-Importance algorithm will reward you if you make transactions with other NEM account holders. The network will consider you two as partners. Although, the system will catch you if you are planning to make a pseudo partnership.
The Scoring System
The transactions pose an impact to your Proof-of-Importance score. The score is based on the transactions you have made in a thirty-day period. More frequent and more substantial sum will help you to improve your score on the NEM network.
Proof-of-Capacity
Proof-of-Capacity consensus example is an upgrade of the famous Proof-of-Work blockchain consensus protocol. The essential characteristic of this one is the “plotting” feature. You will have to devote your computational power and hard drive storage even before you are starting to mine.
This very nature makes the system faster the PoW. The Proof-of-Capacity can create a block in just four minutes whereas the Proof-of-Work takes ten minutes to do the same. Moreover, it tries to tackle the hashing problem of the PoW system. The more solutions or plots you have on your computer, the better your chances are to win the mining battle.
How Does Proof-of-Capacity Work?
To understand the very nature of the consensus theorem, you must grasp two concepts – the plotting and the mining.
By plotting the hard drive of your computer, you are basically creating a “nonce.” The nonces in the Proof-of-Capacity algorithm are a bit different from the Bitcoin’s. Here, you will have to hash your ID and data until you solve the nonces.
Each of the nonces has a total of 8,192 hashes bundled together. The bundle number is again known as the “scoops.” Each ID can receive a maximum total of 4,095 scoops.
The next concept is the “mining” on the hard drive. As we have said, you can receive 0 to 4,095 scoops at a time and store them on your hard drive. You will be assigned a minimum deadline to solve the nonces. This deadline also indicates the time to create a block.
If you can manage to solve the nonces earlier than the other miners, you will get a block as the reward. A famous example could be Burst who has adopted the Proof-of-Capacity algorithm.
The Pros and Cons ofProof-of-Capacity
The mining on the hard drive is way more energy efficient than the regular Proof-of-Work. You will not have to spend fortunes to get expensive mining rigs that we have seen in the Bitcoin protocol. The hard disk of your home PC is just enough to start mining on this consensus algorithm.
To speak the truth, this consensus algorithm blockchain also has some severe drawbacks. First, the process creates a massive amount of redundant disk spaces. The system will favor the miners with bigger storage units posing a threat to the decentralized concept. Even the hackers could exploit the system and inject mining malware into the system.
Proof-of-Burn
This consensus sequence is quite impressive. To safeguard the PoW cryptocurrency, a portion of the coins will be burnt! The process happens as the miners send a few coins to an “Eater Address.” The Eater Addresses cannot spend these coins on any purpose. A ledger keeps track of the burnt coins making them genuinely unspendable. The user who burnt the coins will get a reward as well.
Yes, the burning is a loss. But the damage is temporary as the process will safeguard the coins in the long run from the hackers and their cyber-attacks. Moreover, the burning process increases the stakes of the alternative coins.
Such a scenario increases the chance of a user to mine the next block as well as increases their rewards in the future. So, burning could be used as a mining privilege. The counterparty is an excellent consensus example of a cryptocurrency that uses this blockchain consensus protocol.
The Eater Address
To burn coins, users send them to the Eater Addresses. An Eater Address doesn’t have any private key. So, no user can ever access these addresses to spend the coins held within. Moreover, these addresses get generated in a random fashion.
Although these coins are inaccessible or “gone forever (!)”, they are considered as calculated supply and labeled as burnt.
The Pros and Cons of the Proof-of-Burn Algorithm
The primary reason behind burning the coins is to create more stability. We know the long-term players tend to hold coins for a long time for profits.
The system favors those long-term investors by giving more stable currency and long-term commitment. Moreover, this enhances the decentralization and creates a better-distributed network.
But from whichever angle you look at the scenario, burning coins means wasting it! Even some eater addresses have more than $100,000 worth of Bitcoins in them. There is no way to recover the money – they get burnt!
Proof-of-Weight
Okay, Proof-of-Weight blockchain consensus protocol is on the last position of our list of consensus algorithms. This is a big upgrade of the Proof-of-Stake algorithm. In Proof-of-Stake, the more token you own, the better your chances are to discover more! This idea makes the system a bit biased.
Well, the Proof-of-Weight tries to solve such biased nature of the PoS. Cryptocurrencies like Algorand, Filecoin, and Chia implement the PoWeight. The Proof-of-Weight considers some other factors than owning more tokens like in PoS.
These factors get identified as the “Weighted Factors.” For example, Filecoin considers the amount of IPFS data that you have and weights that factor. Some of the other factors include but not limit to Proof-of-Spacetime and Proof-of-Reputation.
The fundamental advantages of this system include customization and scalability. Although incentivizing could be a big challenge for this consensus algorithm.
Comparison Among The Consesns Algorithms
Consensus Algorithms
Blockchain Platform
Launched Since
Programming Languages
Smart Contracts
Pros
Cons
PoW
Bitcoin
2009
C++
No
Less opportunity for 51% attackBetter Security
Greater energy consumptionCentralization of Miners
PoS
NXT
2013
Java
Yes
Energy efficientMore decentralized
Nothing-at-stake problem
DPoS
Lisk
2016
JavaScript
No
Energy efficientScalableIncreased security
Partially centralizedDouble spend attack
LPoS
Waves
2016
Scala
Yes
Fair usageLease Coins
Decentralization Issue
PoET
Hyperledger Sawtooth
2018
Python, JavaScript, Go, C++, Java, and Rust
Yes
Cheap participation
Need for specialized hardwareNot good for Public Blockchain
PBFT
Hyperledger Fabric
2015
JavaScript, Python, Java REST and Go
Yes
No Need for ConfirmationReduction in Energy
Communication GapSybil Attack
SBFT
Chain
2014
Java, Node, and Ruby
No
Good SecuritySignature Validation
Not for Public Blockchain
DBFT
NEO
2016
Python,.NET, Java, C++, C, Go, Kotlin, JavaScript
Yes
ScalableFast
Conflictions in the Chain
DAG
IOTA
2015
Javascript, Rust, Java Go, and C++
In Process
Low cost networkScalability
Implementation gapsNot suited for smart contracts
POA
Decred
2016
Go
Yes
Reduces the probability of the 51% attackEqual contribution
Greater energy consumptionDouble signing
PoI
NEM
2015
Java, C++XEM
Yes
VestingTransaction partnership
Decentralization Issue
PoC
Burstcoin
2014
Java
Yes
CheapEfficientDistributed
Favoring bigger fishesDecentralization issue
PoB
Slimcoin
2014
Python, C++, Shell, JavaScript
No
Preservation of the network
Not for short term investorsWasting coins
PoWeight
Filecoin
2017
SNARK/STARK
Yes
ScalableCustomizable
Issue with Incentivization
Chapter-8: Concluding Notes
It is the consensus algorithms that make the nature of the blockchain networks so versatile. Yes, there is not a single consensus algorithm blockchain that can claim it to be perfect. But that is the beauty of the technology we guess – the constant change for betterment.
If these consensus algorithms weren’t there, we would still have to depend on the Proof-of-Work. Whether you like it or not, the PoW kind of threatens the decentralization and distributed nature of the blockchains.
The whole idea of the blockchain technology is decentralization and a fight against the monarchy. It’s high time the common people put a stop to the corrupted and faulty system.
We are eagerly waiting for the better and better consensus algorithms that will change our lives for a better tomorrow!
This process involves removing the existing content index files, which will trigger Exchange Search to re-index that database. The re-indexing process can cause a high load on the Exchange server, which may impact performance for the server. So you should carefully consider the timing of any content index rebuilds, and how it might impact your end users. The content index files are located in the same path as the database EDB file, in a sub-folder named with a GUID.
Before the corrupt index files can be removed, the Exchange Search services must be stopped. While these services are stopped, searches in OWA will not be able to be performed by end users, and all of the database content indexes on the server will be reported as “Failed” by Get-MailboxDatabaseCopyStatus.
Next, delete the GUID-named folder that contains the content index files. If the folder will not delete due to files in use, then it’s likely that either:
You haven’t stopped the correct search services
Another process, such as file-level anti-virus software, has a lock on the folder (and may be the cause of the index corrupting to begin with)
After deleting the files, start the search services again.
After a delay while Exchange Search evaluates the situation, the database will be re-indexed. The content index will have a state of “Crawling” while this is occurring.
You can monitor the progress of the database crawl by watching the MSExchange Search IndexesCrawler: Mailboxes Remaining counter in Performance Monitor for that database instance.
Summary :
Get-MailboxDatabaseCopyStatus -Server SRV-EX13.farad.local | ft -auto locate the database not healthy Invoke-Command -ComputerName SRV-EX13.farad.local {Stop-Service MSExchangeFastSearch; Stop-Service HostControllerService} delete folder.single in the exchange folder database correspond to not healthy Invoke-Command -ComputerName SRV-EX13.farad.local {Start-Service MSExchangeFastSearch; Start-Service HostControllerService}
This website uses cookies to improve your experience. We'll assume you're ok with this, but you can opt-out if you wish.AcceptRejectRead More
Privacy & Cookies Policy
Privacy Overview
This website uses cookies to improve your experience while you navigate through the website. Out of these cookies, the cookies that are categorized as necessary are stored on your browser as they are as essential for the working of basic functionalities of the website. We also use third-party cookies that help us analyze and understand how you use this website. These cookies will be stored in your browser only with your consent. You also have the option to opt-out of these cookies. But opting out of some of these cookies may have an effect on your browsing experience.
Necessary cookies are absolutely essential for the website to function properly. This category only includes cookies that ensures basic functionalities and security features of the website. These cookies do not store any personal information.