Fail2ban and wordpress

Find the wordpress log file.

normally is configured in httpd.conf (if u are using apache web server)
Find the wordpress log file.
normally is configured in httpd.conf (if u are using apache web server)

    # The following directives define some format nicknames for use with
    # a CustomLog directive (see below).
    #

    #LogFormat "%h %l %u %t \"%r\" %>s %b \"%{Referer}i\" \"%{User-Agent}i\"" combined
    LogFormat "%v %h %l %u %t \"%r\" %>s %b \"%{Referer}i\" \"%{User-Agent}i\"" combined
    LogFormat "%h %l %u %t \"%r\" %>s %b" common
    LogFormat "%h %v %l %u %t \"%r\" %>s %b" comonvhost

    
      # You need to enable mod_logio.c to use %I and %O
      LogFormat "%h %l %u %t \"%r\" %>s %b \"%{Referer}i\" \"%{User-Agent}i\" %I %O" combinedio

    
    #
    # The location and format of the access logfile (Common Logfile Format).
    # If you do not define any access logfiles within a 
    # container, they will be logged here.  Contrariwise, if you *do*
    # define per- access logfiles, transactions will be
    # logged therein and *not* in this file.
    #
    #CustomLog "logs/access_log" common
    #
    # If you prefer a logfile with access, agent, and referer information
    # (Combined Logfile Format) you can use the following directive.
    #
    CustomLog "logs/access_log" combined

here the log file parameters

My server example of failed login to wordpress


%v       %h                     %l %u %t                     \"%r\"                        %>s
saic.it 85.10.117.176 - -       [30/Sep/2017:09:29:02 +0200] "POST /wp-login.php HTTP/1.1" 200 
%b   \"%{Referer}i\"                   \"%{User-Agent}i\""
5444 "http://www.saic.it/wp-login.php" "Mozilla/5.0 (Macintosh; Intel Mac OS X 10.11; rv:52.0) Gecko/20100101 Firefox/52.0"

Link

Link2

Install dependencies for JQuery into Angular2

3 Steps:
Install jQuery. (skip if already installed)
npm install jquery –save
Install types for jQuery.
npm install @types/jquery –save
Import jQuery in app.module.ts.
import * as $ from ‘jquery’;
The best way to enable the production mode for an Angular 2 application, is to use angular-cli and build the application with ng build -prod. This will build the application with production profile. Using angular-cli has the benefit of being able to use development mode using ng serve or ng build while developing without altering the code all the time.

How to test if the email address exists

Source Link

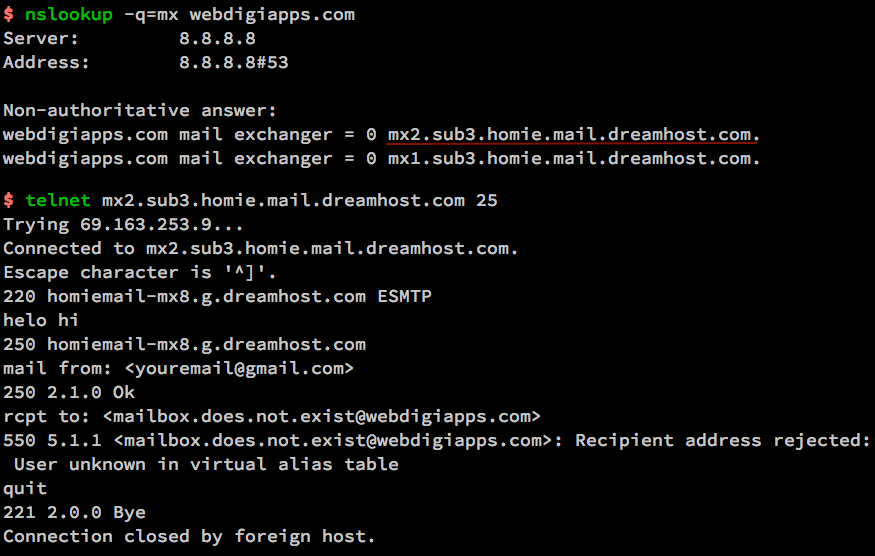
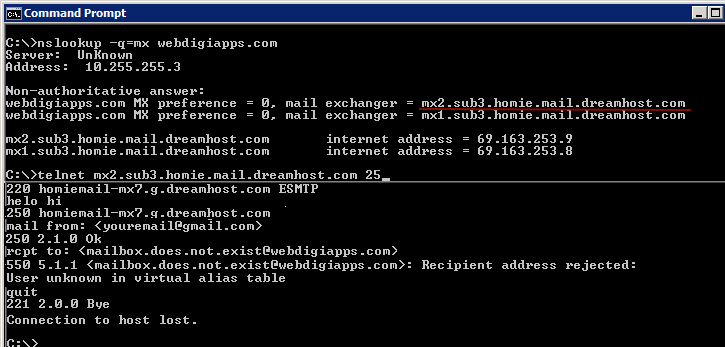
To check if user entered email mailbox.does.not.exist@webdigiapps.com really exists go through the following in command prompt on windows / terminal on mac. The commands you type in are in green and the server response is in blue. Please refer to MAC & PC screenshots towards the end of this post.

Step 1 – Find mail exchanger or mail server of webdigiapps.com

COMMAND:
nslookup -q=mx webdigiapps.com
RESPONSE:
Non-authoritative answer:
webdigiapps.com mail exchanger = 0 mx2.sub3.homie.mail.dreamhost.com.
webdigiapps.com mail exchanger = 0 mx1.sub3.homie.mail.dreamhost.com.

Step 2 – Now we know the mail server address so let us connect to it. You can connect to one of the exchanger addresses in the response from Step 1.

COMMAND:
telnet mx2.sub3.homie.mail.dreamhost.com 25
RESPONSE:
Connected to mx2.sub3.homie.mail.dreamhost.com.
Escape character is ‘^]’.
220 homiemail-mx7.g.dreamhost.com ESMTP

COMMAND:
helo hi
RESPONSE:
250 homiemail-mx8.g.dreamhost.com

COMMAND:
mail from: <youremail@gmail.com>
RESPONSE:
250 2.1.0 Ok

COMMAND:
rcpt to: <mailbox.does.not.exist@webdigiapps.com>
RESPONSE:
550 5.1.1 <mailbox.does.not.exist@webdigiapps.com>: Recipient address rejected: User unknown in virtual alias table

COMMAND:
quit
RESPONSE:
221 2.0.0 Bye

Screenshots – MAC Terminal & Windows

MAC email verification
Windows email verification

NOTES:

1) the 550 response indicates that the email address is not valid and you have caught a valid but wrong email address. This code can be on the server and called on AJAX when user tabs out of the email field.  The entire check will take less than 2 seconds to run and you can make sure that the email is correct.
2) If email was present the server will respond with a 250 instead of 550
3) There are certain servers with a CATCH ALL email and this means all email address are accepted as valid on their servers (RARE but some servers do have this setting).
4) Please do not use this method to continuously to check for availability of gmail / yahoo / msn accounts etc as this may cause your IP to be added to a blacklist.
5) This is to supplement the standard email address javascript validation.

IPTables – Load Balance Incoming Web Traffic

First of ALL

The important thing to remember as we go forward is that ORDER MATTERS! Rules are executed from top to bottom.

Note that Rules are applied in order of appearance, and the inspection ends immediately when there is a match. Therefore, for example, if a Rule rejecting ssh connections is created, and afterward another Rule is specified allowing ssh, the Rule to reject is applied and the later Rule to accept the ssh connection is not.

At the top of the /etc/sysconfig/iptables (Centos 7) the rules are more important !!


Instead of using the default policy, I normally recommend making an explicit DROP/REJECT rule at the bottom of your chain that matches everything. You can leave your default policy set to ACCEPT and this should reduce the chance of blocking all access to the server.

Load Balance Incoming Web Traffic

This uses the iptables nth extension. The following example load balances the HTTPS traffic to three different ip-address. For every 3th packet, it is load balanced to the appropriate server (using the counter 0).

iptables -A PREROUTING -i eth0 -p tcp --dport 443 -m state --state NEW -m nth --counter 0 --every 3 --packet 0 -j DNAT --to-destination 192.168.1.101:443
iptables -A PREROUTING -i eth0 -p tcp --dport 443 -m state --state NEW -m nth --counter 0 --every 3 --packet 1 -j DNAT --to-destination 192.168.1.102:443
iptables -A PREROUTING -i eth0 -p tcp --dport 443 -m state --state NEW -m nth --counter 0 --every 3 --packet 2 -j DNAT --to-destination 192.168.1.103:443

Allow Loopback Access

You should allow full loopback access on your servers. i.e access using 127.0.0.1

iptables -A INPUT -i lo -j ACCEPT
iptables -A OUTPUT -o lo -j ACCEPT

Allow Internal Network to External network.

On the firewall server where one ethernet card is connected to the external, and another ethernet card connected to the internal servers, use the following rules to allow internal network talk to external network.

In this example, eth1 is connected to external network (internet), and eth0 is connected to internal network (For example: 192.168.1.x).

iptables -A FORWARD -i eth0 -o eth1 -j ACCEPT

Allow outbound DNS

The following rules allow outgoing DNS connections.

iptables -A OUTPUT -p udp -o eth0 --dport 53 -j ACCEPT
iptables -A INPUT -p udp -i eth0 --sport 53 -j ACCEPT

Prevent DoS Attack

The following iptables rule will help you prevent the Denial of Service (DoS) attack on your webserver.

iptables -A INPUT -p tcp --dport 80 -m limit --limit 25/minute --limit-burst 100 -j ACCEPT

In the above example:

  • -m limit: This uses the limit iptables extension
  • –limit 25/minute: This limits only maximum of 25 connection per minute. Change this value based on your specific requirement
  • –limit-burst 100: This value indicates that the limit/minute will be enforced only after the total number of connection have reached the limit-burst level.

Port Forwarding

The following example routes all traffic that comes to the port 442 to 22. This means that the incoming ssh connection can come from both port 22 and 422.

iptables -t nat -A PREROUTING -p tcp -d 192.168.102.37 --dport 422 -j DNAT --to 192.168.102.37:22

If you do the above, you also need to explicitly allow incoming connection on the port 422.

iptables -A INPUT -i eth0 -p tcp --dport 422 -m state --state NEW,ESTABLISHED -j ACCEPT
iptables -A OUTPUT -o eth0 -p tcp --sport 422 -m state --state ESTABLISHED -j ACCEPT

Log Dropped Packets

You might also want to log all the dropped packets. These rules should be at the bottom.

First, create a new chain called LOGGING.

iptables -N LOGGING

Next, make sure all the remaining incoming connections jump to the LOGGING chain as shown below.

iptables -A INPUT -j LOGGING

Next, log these packets by specifying a custom “log-prefix”.

iptables -A LOGGING -m limit --limit 2/min -j LOG --log-prefix "IPTables Packet Dropped: " --log-level 7

Finally, drop these packets.

iptables -A LOGGING -j DROP

(most of the rules from here)

Example:

iptables -A INPUT --jump ACCEPT --protocol all   --source 127.0.0.1
iptables -A INPUT --jump ACCEPT --protocol tcp   --dport 22
iptabels -A INPUT --jump ACCEPT --protocol icmp
iptables -A INPUT --jump ACCEPT --match state    --state ESTABLISHED,RELATED
iptables -A INPUT --jump REJECT --protocol all